![[Updated] 2024 Approved The Perfect Playback Top Strategies for Gameplay Videos](https://thmb.techidaily.com/cdd8eafd008cf95809620f415b6d0453d80ccae0c32a9023581f934b16334c5a.jpg)
"[Updated] 2024 Approved The Perfect Playback Top Strategies for Gameplay Videos"
The Perfect Playback: Top Strategies for Gameplay Videos
Sharing recordings about PC games is not a troublesome errand as there are sufficient Nintendo switch screen recorders you can use on a PC. Be that as it may, how to screen record Nintendo switch interactivity? There are two time utilized strategies: recording interactivity with the implicit apparatus in Switch or reflecting Switch game on PC and recording it. Regulators accompany an implicit catch button, however as of right presently it’s just equipped for taking screen captures or recording the most recent 30 seconds of video. Assuming that is sufficient for you, then, at that point, you should simply hold down the catch button (set apart with a square) and sit tight for the catching message to show up at the highest point of your screen. This post will walk you through those two different ways bit by bit. Continuing to peruse assuming you need to know the subtleties.
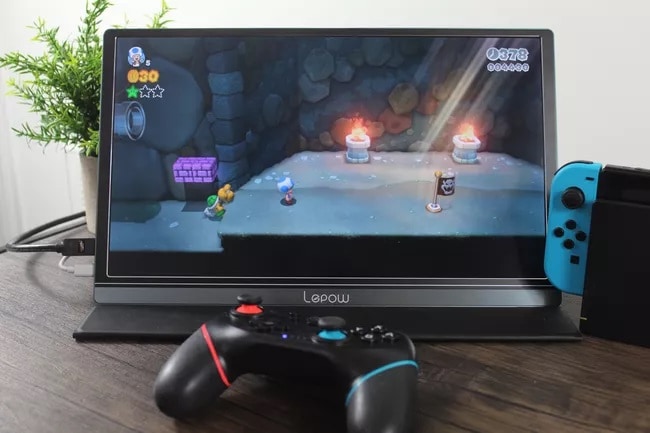
One of the most expected and all around evaluated computer game control centres that have been delivered in this 21st century is Nintendo Switch. This game control centre was created and delivered by Nintendo in many areas after 2017. Many individuals were despondent to find that catching ongoing interaction and gushing on the Nintendo Switch was preposterous through a straightforward press of a button on dispatch. Nintendo has refreshed the framework to take into consideration short catches, yet for additional top to bottom strategies, you should go through some money. Here are the various ways of catching ongoing interaction on the Nintendo Switch. Nonetheless, assuming you need to record Switch interactivity for over 30 seconds, you want to utilize a catch card to stream and record Nintendo Switch ongoing interaction video.
Part 1. Record Switch Gameplay on PC
Part 2. Use Nintendo Switch Built-In Tool
Part 3. Record Switch Gameplay with Capture Card
Part 1. Record Switch Gameplay on PC
Regardless of whether you want to record the Switch interactivity with 1080P, or catch the entire video for additional altering, Wondershare Filmora is an across-the-board screen recorder to catch screen recordings, record amplifier, and framework sound, take previews and get webcam film. Additionally, you can likewise add explanations and shapes to the recording document.
Nonetheless, as the pre-introduced recorder upholds just essential capacities, you can record the ongoing interaction with an outsider recorder assuming you want some high-level highlights. Filmora program empowers you to record Switch ongoing interaction on your PC for quite a while with top-notch output.
Furthermore, this instrument can choose a recording region or specific region to record the screen. It can likewise save the recorded ongoing interaction into different organizations like MP4, WMA, MOV, and then some.
For Win 7 or later (64-bit)
For macOS 10.12 or later
Step 1: Install and Launch Filmora
Visit the official website and download the latest version of Filmora from there. As soon as the download has been completed, launch it right away. In the starting window, hit the New Project catch and you will see the underlying window interface of this product. From that interface, click on the record button and select the Record PC Screen alternative as follow:

Step 2 : Customize the Screen Recording Settings
In the account screen window, hit the Settings button at the correct side of the screen and you will see the extended choices for the chronicle screen menu. Here you have a lot of alternatives for your recording setting which are easy to pt for, so you can have a superior comprehension of each choice as follow:
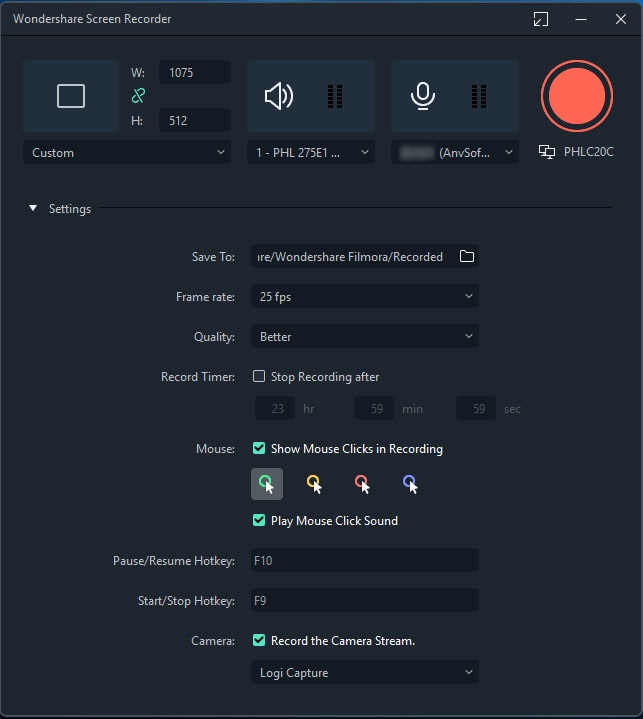
Step 3: Start Recording
In the final step, when everything is ready, hit the Record button and let the game begin! You will begin the chronicle by keeping the basic general guideline. Then, as you’re finished with the recording, Hit the red dabbed square-shaped button which at last stops the recording account soon after a few seconds as follow:

Step 4: Export and Share your Webcam Recordings
With Filmora, you have a lot of choices to select while sending out your screen catching and gameplays after you’re finished with the altering part. Presently to go for the basic save to your PC, hit the Export button at the highest point of the product interface as follow.
Presently to share your work of art straightforwardly to YouTube or some other renowned stage, you can without much of a stretch select your desired platform to share from there.
Part 2. Record Switch with Nintendo Switch Built-In Tool
Nintendo Switch is an astounding computer game control centre that empowers you to play different games with it. Nintendo Switch can be viewed as both a home control centre and a compact gadget, and its compactness is the reason an ever-increasing number of kinds of games are relocated to it. In addition, it can’t fulfil the requirements of recording all games. The Switch regulator is the inherent element to record Switch ongoing interaction recordings. It empowers you to record the recordings and take previews.
Steps to Record Switch with Nintendo
On the off chance that you are a game anchor, you might need to record your Switch interactivity and offer the recordings with your crowds via web-based media sites. What are the best strategies to catch the ongoing interaction recordings of Switch? How to record the recordings with the best quality? Simply get more familiar with the checked techniques from the article.
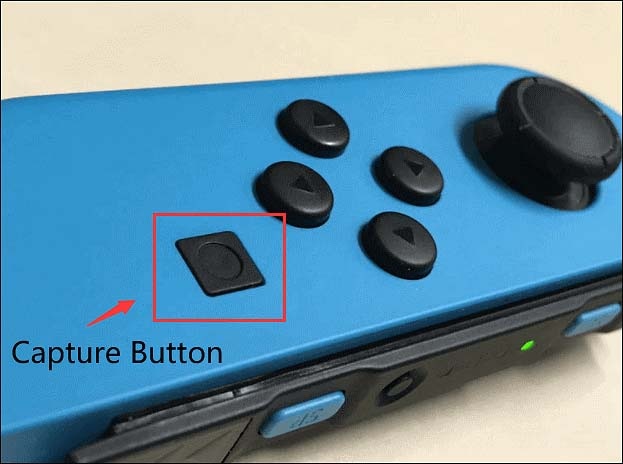
Step 1: Start Gameplay and Locate Capture Button
At the point when you are prepared for recording Switch interactivity, simply long-press the Capture button, and afterwards, it will record a video of 30 seconds.
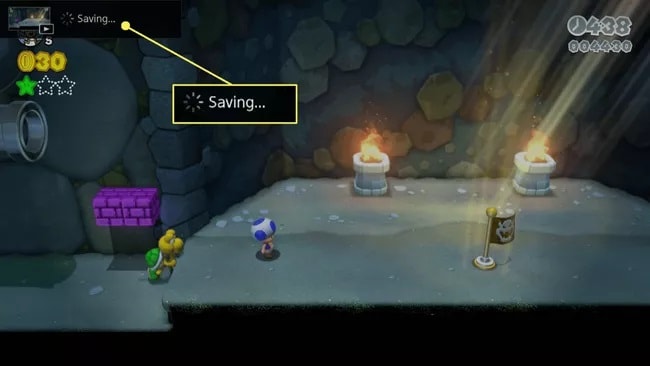
Step 2: Start Recording
The Switch can just record the video before you press the Capture button, so it’s hard to set aside the perfect time to catch the ideal recordings. Assuming you get a message that let you know that the video has been saved at the upper left, it implies you have recorded Switch interactivity effectively.
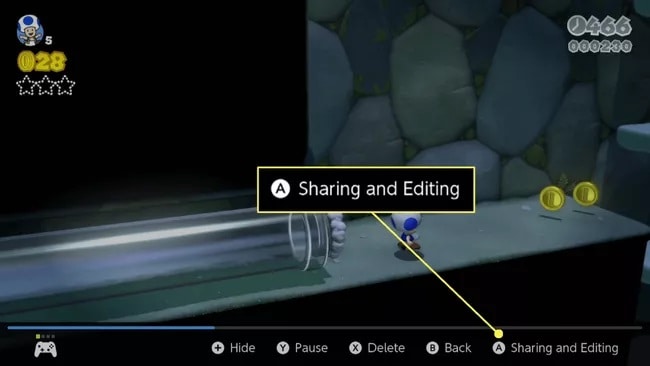
Step 3: Locate and Share the Saved Recording
In any case, there are numerous constraints to record interactivity recordings for the strategy. It has a period constraint that you can just record Switch ongoing interaction for 30 seconds. From that point onward, you can check the recorded video from the Album button. Then, at that point, you can transfer it to Facebook or Twitter.
Part 3. Record Switch Gameplay with Capture Card
Assuming you need to stream ongoing interaction from Nintendo Switch or record incredible interactivity content for your online media accounts. You want to have a catch card to do it. In this part, we will examine how to catch cards, for example, HD60 S works with Nintendo Switch. Nintendo Switch has HDMI support. Accordingly, you can utilize an HD catch card to record ongoing interaction on Switch. Coincidentally, you can stream Switch ongoing interaction with a catch card too. There are numerous famous catch cards for Switch streaming and recording, for example, Elgato Game Capture HD60 S, Aver Media Live Gamer Portable 2 Plus and that’s just the beginning. You can pick anyone to evaluate the record on Nintendo Switch for over 30 seconds dependent on your spending plan.
Step 1: Choose the Capture Card
Plug an HDMI Out port into Nintendo Switch Dock. Then, at that point, plug an HDMI In port into the Elgato Game Capture HD60 S. You can utilize other catch cards to record Switch ongoing interaction too.
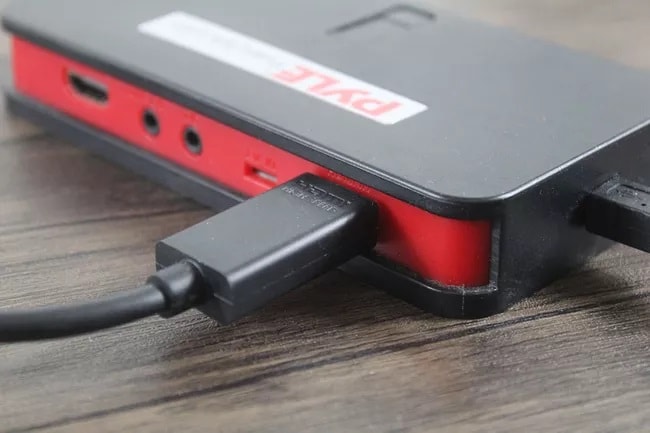
Step 2: Plug-in the Selected Capture Card
Interface the Out end into the Elgato Game Capture HD60S. Then, at that point, interface the in port into your TV or another screen you use. Insert your Nintendo Switch into the Nintendo Switch Dock. Afterwards, utilize a USB link to interface Elgato Game Capture HD60S to your PC. You can run the Elgato Game Capture HD programming for Switch ongoing interaction recording.
Step 3: Start/End Gameplay Recording
Go to System Settings to change the Switch recording subtleties. You can set RGB range, TV goal, screen size and then some. Click Record on your beginning messing around with Switch. Presently you can record Nintendo Switch ongoing interaction video with a catch card.
Furthermore, this capturing card can record sound utilizing an HDMI link. All the more along these lines, it is probably the best apparatus to catch ongoing interaction film because the interactivity won’t be handled through extra programming. The best thing about this also is it can evaluate records without slack for your ongoing interaction recordings.
Filmora Game Screen Recorder
Record computer game screen and webcam
Capture system and microphone audio
Customize the target recording area
Edit videos with thousands of effects and tools
4. Related FAQs
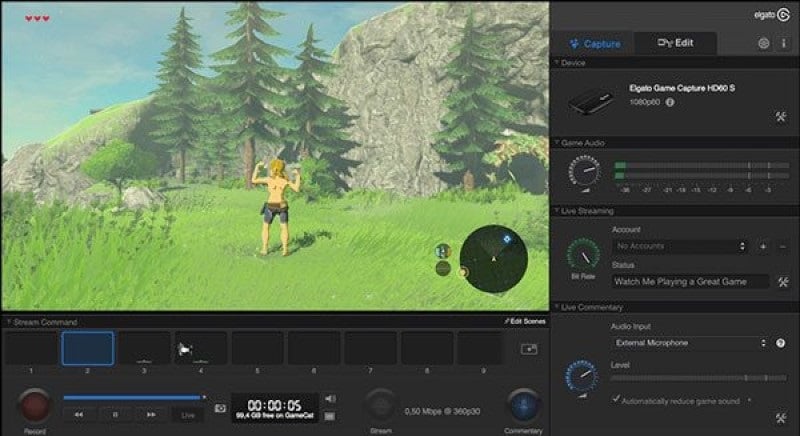
Search for the Game Capture HD programming in your work area and open it up. It ought to naturally deliver the presentation on your screen and in the product. Presently, all you need to do to catch interactivity on the Nintendo Switch is hit the record button!
How Do You Record Full Gameplay on Nintendo Switch?
At the point when you need to record the full gameplay, assuming you run into issues with the Switch’s underlying recording framework or find a particular game that isn’t viable with it, different choices are accessible. The reliable method for putting away and sharing your Nintendo Switch ongoing interaction is by utilizing a catch card. These uncommon cards comprise an outsider equipment framework that records screen film using the framework you’re utilizing. It can likewise abrogate time restrictions and even square interactivity recording.
Can You Record More Than 30 Seconds on Switch?
As mentioned earlier, towards the end of 2017, the Nintendo Switch was refreshed to form 4.0, which incorporated the capacity to record 30-second interactivity clasps of specific games to share via web-based media. Beforehand, Switch clients could just snap and offer screen captures with the world, however, presently they can feature the best and most entertaining interactivity minutes playing Nintendo’s best. At the hour of the update’s delivery, just a little small bunch of Nintendo first-party games upheld this component, yet presently the rundown has extended to handfuls and many games.
How to Record Longer Videos on Nintendo Switch?
Nintendo might build the most extreme length of video accounts later on, however recording anything longer than 30 seconds requires outer equipment. To screen record your Switch or take recordings longer than 30 seconds, you want an independent video catch gadget or a catch card associated with a PC. For that, Connect the catch gadget to a PC, or addition your capacity medium. It just works with the first Nintendo Switch. The Switch Lite can’t output video in any capacity, so it’s impossible to utilize an outside video catch gadget with that rendition of the equipment.
Final Words
A catch card is a gadget that can be associated with a PC to record on-screen content. Furthermore, the catch card can assist with encoding what’s going on the screen so you can play it as a Live stream or save it as a video document. In any case, the catch card can’t encode the actual information. It helps a significant job in sending the information from one finish to the next end. If you want to record a long Nintendo interactivity video for YouTube, you would be advised to attempt Filmora recommendation as it’ll give you the best and easiest approach to record the gameplay without any hassle.
Part 2. Use Nintendo Switch Built-In Tool
Part 3. Record Switch Gameplay with Capture Card
Part 1. Record Switch Gameplay on PC
Regardless of whether you want to record the Switch interactivity with 1080P, or catch the entire video for additional altering, Wondershare Filmora is an across-the-board screen recorder to catch screen recordings, record amplifier, and framework sound, take previews and get webcam film. Additionally, you can likewise add explanations and shapes to the recording document.
Nonetheless, as the pre-introduced recorder upholds just essential capacities, you can record the ongoing interaction with an outsider recorder assuming you want some high-level highlights. Filmora program empowers you to record Switch ongoing interaction on your PC for quite a while with top-notch output.
Furthermore, this instrument can choose a recording region or specific region to record the screen. It can likewise save the recorded ongoing interaction into different organizations like MP4, WMA, MOV, and then some.
For Win 7 or later (64-bit)
For macOS 10.12 or later
Step 1: Install and Launch Filmora
Visit the official website and download the latest version of Filmora from there. As soon as the download has been completed, launch it right away. In the starting window, hit the New Project catch and you will see the underlying window interface of this product. From that interface, click on the record button and select the Record PC Screen alternative as follow:
Step 2 : Customize the Screen Recording Settings
In the account screen window, hit the Settings button at the correct side of the screen and you will see the extended choices for the chronicle screen menu. Here you have a lot of alternatives for your recording setting which are easy to pt for, so you can have a superior comprehension of each choice as follow:
Step 3: Start Recording
In the final step, when everything is ready, hit the Record button and let the game begin! You will begin the chronicle by keeping the basic general guideline. Then, as you’re finished with the recording, Hit the red dabbed square-shaped button which at last stops the recording account soon after a few seconds as follow:
Step 4: Export and Share your Webcam Recordings
With Filmora, you have a lot of choices to select while sending out your screen catching and gameplays after you’re finished with the altering part. Presently to go for the basic save to your PC, hit the Export button at the highest point of the product interface as follow.
Presently to share your work of art straightforwardly to YouTube or some other renowned stage, you can without much of a stretch select your desired platform to share from there.
Part 2. Record Switch with Nintendo Switch Built-In Tool
Nintendo Switch is an astounding computer game control centre that empowers you to play different games with it. Nintendo Switch can be viewed as both a home control centre and a compact gadget, and its compactness is the reason an ever-increasing number of kinds of games are relocated to it. In addition, it can’t fulfil the requirements of recording all games. The Switch regulator is the inherent element to record Switch ongoing interaction recordings. It empowers you to record the recordings and take previews.
Steps to Record Switch with Nintendo
On the off chance that you are a game anchor, you might need to record your Switch interactivity and offer the recordings with your crowds via web-based media sites. What are the best strategies to catch the ongoing interaction recordings of Switch? How to record the recordings with the best quality? Simply get more familiar with the checked techniques from the article.
Step 1: Start Gameplay and Locate Capture Button
At the point when you are prepared for recording Switch interactivity, simply long-press the Capture button, and afterwards, it will record a video of 30 seconds.
Step 2: Start Recording
The Switch can just record the video before you press the Capture button, so it’s hard to set aside the perfect time to catch the ideal recordings. Assuming you get a message that let you know that the video has been saved at the upper left, it implies you have recorded Switch interactivity effectively.
Step 3: Locate and Share the Saved Recording
In any case, there are numerous constraints to record interactivity recordings for the strategy. It has a period constraint that you can just record Switch ongoing interaction for 30 seconds. From that point onward, you can check the recorded video from the Album button. Then, at that point, you can transfer it to Facebook or Twitter.
Part 3. Record Switch Gameplay with Capture Card
Assuming you need to stream ongoing interaction from Nintendo Switch or record incredible interactivity content for your online media accounts. You want to have a catch card to do it. In this part, we will examine how to catch cards, for example, HD60 S works with Nintendo Switch. Nintendo Switch has HDMI support. Accordingly, you can utilize an HD catch card to record ongoing interaction on Switch. Coincidentally, you can stream Switch ongoing interaction with a catch card too. There are numerous famous catch cards for Switch streaming and recording, for example, Elgato Game Capture HD60 S, Aver Media Live Gamer Portable 2 Plus and that’s just the beginning. You can pick anyone to evaluate the record on Nintendo Switch for over 30 seconds dependent on your spending plan.
Step 1: Choose the Capture Card
Plug an HDMI Out port into Nintendo Switch Dock. Then, at that point, plug an HDMI In port into the Elgato Game Capture HD60 S. You can utilize other catch cards to record Switch ongoing interaction too.
Step 2: Plug-in the Selected Capture Card
Interface the Out end into the Elgato Game Capture HD60S. Then, at that point, interface the in port into your TV or another screen you use. Insert your Nintendo Switch into the Nintendo Switch Dock. Afterwards, utilize a USB link to interface Elgato Game Capture HD60S to your PC. You can run the Elgato Game Capture HD programming for Switch ongoing interaction recording.
Step 3: Start/End Gameplay Recording
Go to System Settings to change the Switch recording subtleties. You can set RGB range, TV goal, screen size and then some. Click Record on your beginning messing around with Switch. Presently you can record Nintendo Switch ongoing interaction video with a catch card.
Furthermore, this capturing card can record sound utilizing an HDMI link. All the more along these lines, it is probably the best apparatus to catch ongoing interaction film because the interactivity won’t be handled through extra programming. The best thing about this also is it can evaluate records without slack for your ongoing interaction recordings.
Filmora Game Screen Recorder
Record computer game screen and webcam
Capture system and microphone audio
Customize the target recording area
Edit videos with thousands of effects and tools
4. Related FAQs
Search for the Game Capture HD programming in your work area and open it up. It ought to naturally deliver the presentation on your screen and in the product. Presently, all you need to do to catch interactivity on the Nintendo Switch is hit the record button!
How Do You Record Full Gameplay on Nintendo Switch?
At the point when you need to record the full gameplay, assuming you run into issues with the Switch’s underlying recording framework or find a particular game that isn’t viable with it, different choices are accessible. The reliable method for putting away and sharing your Nintendo Switch ongoing interaction is by utilizing a catch card. These uncommon cards comprise an outsider equipment framework that records screen film using the framework you’re utilizing. It can likewise abrogate time restrictions and even square interactivity recording.
Can You Record More Than 30 Seconds on Switch?
As mentioned earlier, towards the end of 2017, the Nintendo Switch was refreshed to form 4.0, which incorporated the capacity to record 30-second interactivity clasps of specific games to share via web-based media. Beforehand, Switch clients could just snap and offer screen captures with the world, however, presently they can feature the best and most entertaining interactivity minutes playing Nintendo’s best. At the hour of the update’s delivery, just a little small bunch of Nintendo first-party games upheld this component, yet presently the rundown has extended to handfuls and many games.
How to Record Longer Videos on Nintendo Switch?
Nintendo might build the most extreme length of video accounts later on, however recording anything longer than 30 seconds requires outer equipment. To screen record your Switch or take recordings longer than 30 seconds, you want an independent video catch gadget or a catch card associated with a PC. For that, Connect the catch gadget to a PC, or addition your capacity medium. It just works with the first Nintendo Switch. The Switch Lite can’t output video in any capacity, so it’s impossible to utilize an outside video catch gadget with that rendition of the equipment.
Final Words
A catch card is a gadget that can be associated with a PC to record on-screen content. Furthermore, the catch card can assist with encoding what’s going on the screen so you can play it as a Live stream or save it as a video document. In any case, the catch card can’t encode the actual information. It helps a significant job in sending the information from one finish to the next end. If you want to record a long Nintendo interactivity video for YouTube, you would be advised to attempt Filmora recommendation as it’ll give you the best and easiest approach to record the gameplay without any hassle.
Also read:
- [New] First Captured Visual Saga Critique with Alternate Views for 2024
- [New] The Ultimate Guide Screen Recording Minecraft with Your MacOS
- [New] Unlocking the Potential of Recording Google Voice Calls
- [Updated] Ideal Approaches to Mobile Content Preservation for 2024
- [Updated] Prowl These Top-Ranked Sites for Generous Vector Imagery Access
- [Updated] Top-Ranked Animation Set for Typography for 2024
- [Updated] Unveiling the Best Ways to Capture Your Minecraft Quests on a Mac for 2024
- Conquer Radio Driver Hurdles in Windows OS
- Decoding Revenue How Much Do Creators Earn on Youtube?
- How to retrieve erased call logs from Play 40C?
- In 2024, Unlocking an iCloud Locked iPad and iPhone 12
- RealTime CamEffects by ManyCam: Innovative Virtual Webcam Technology
- Ultimate Liberty 2024'S Video Capture Freedom App
- Ultimate Selection Top HDR Camera Picks for 2024
- Title: [Updated] 2024 Approved The Perfect Playback Top Strategies for Gameplay Videos
- Author: Mary Shelley
- Created at : 2025-01-24 23:40:27
- Updated at : 2025-01-25 17:00:55
- Link: https://screen-sharing-recording.techidaily.com/updated-2024-approved-the-perfect-playback-top-strategies-for-gameplay-videos/
- License: This work is licensed under CC BY-NC-SA 4.0.