
Swift Screen Tape with Sound Included
Swift Screen Tape with Sound Included
QuickTime Player is the default media player on Mac. However, QuickTime is not just a simple media player to play video and audio files. Do you know that you can record your Mac screen with QuickTime? Not just recording the screen video, you can capture your screen with audio. This means QuickTime screen recording with audio feature allows you to record video of any video streaming platform such as YouTube by playing them on your Mac screen.
Even though QuickTime Player screen recording feature is inbuilt, the audio capturing feature does not come pre-installed. You will need to install a QuickTime extension so that you can record the audio along with screen video. In this article, we will illustrate QuickTime how to record screen with sound, and we will provide you with a better alternative to get the job done in simple steps.
Part 1. Steps to Use QuickTime Record Screen and Audio
If you are going to record a video playing on your Mac, QuickTime is a great choice. You can record your screen perfectly but the only issue is that QuickTime player screen recording audio feature is not available. That does not mean you cannot record screen as well as audio with QuickTime. Here are the steps on QuickTime how to record screen with sound.
Step 1: You will have to install a free extension called SoundFlower so that you can record audio through QuickTime along with recording the screen. Therefore, download SoundFlower free extension software. The main job of SoundFlower is to channel the audio playing from one application to another. Install SoundFlower application on your Mac from the downloaded file.
Step 2: Once you have installed SoundFlower on your Mac, restart your computer. This will ensure that there is no issue with QuickTime screen recording with sound.
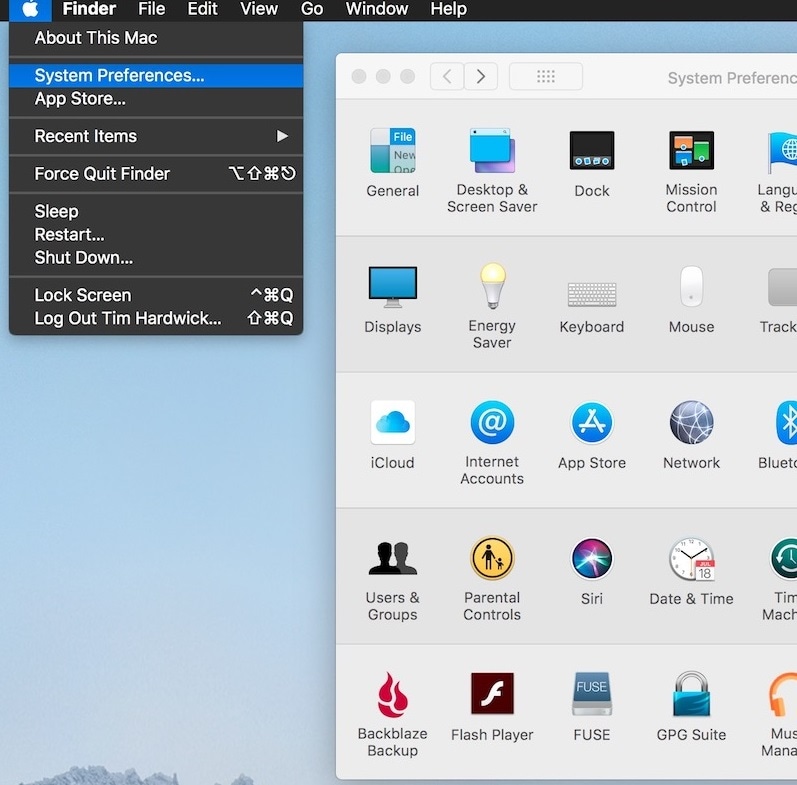
Step 3: Go to Apple menu and open System Preferences.
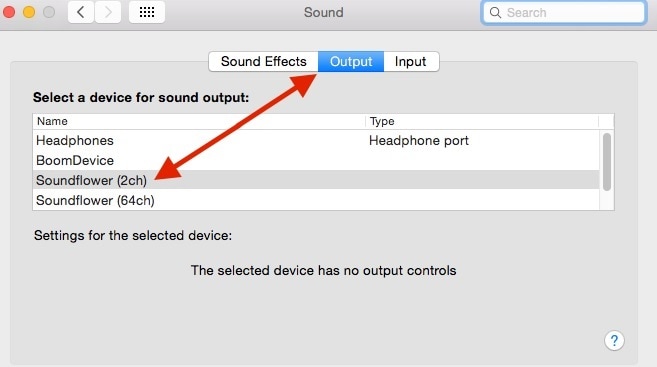
Step 4: Go to Sound tab and from Sound Output, select SoundFlower(2ch) option. This will make SoundFlower the active output by feeding the audio signal directly to SoundFlower instead of system speakers.
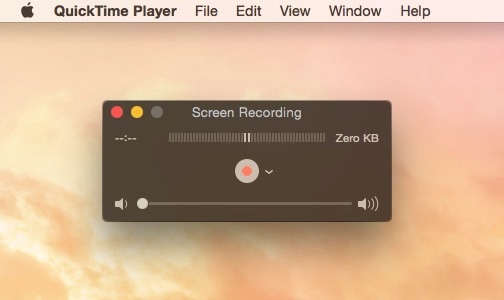
Step 5: Now, it is time for QuickTime player screen recording with audio. Launch QuickTime and go to File > New Screen Recording option.
Step 6: You can start recording anytime you want by pressing the Record button. Make sure that sound source is selected as SoundFlower(2ch) and quality is selected as high. You can record any video that you are playing on the browser as well as record your gameplay with audio.
Step 7: Once you are done recording, press the Stop button. You can go to File > Save option to save the recorded video file.
Once your recording is over, you should go to Apple Menu > System Preferences > Sound tab and select Sound Output as Internal Speakers.
Part 2. How to Trim Videos in QuickTime Player
You may need to trim out some parts of the video to get rid of the unwanted parts and keep only the important parts. You can do the trim work easily in QuickTime Player and here are the steps to follow.
Step 1: Launch QuickTime Player and go to File > Open File option. Select the video file that you want to trim.
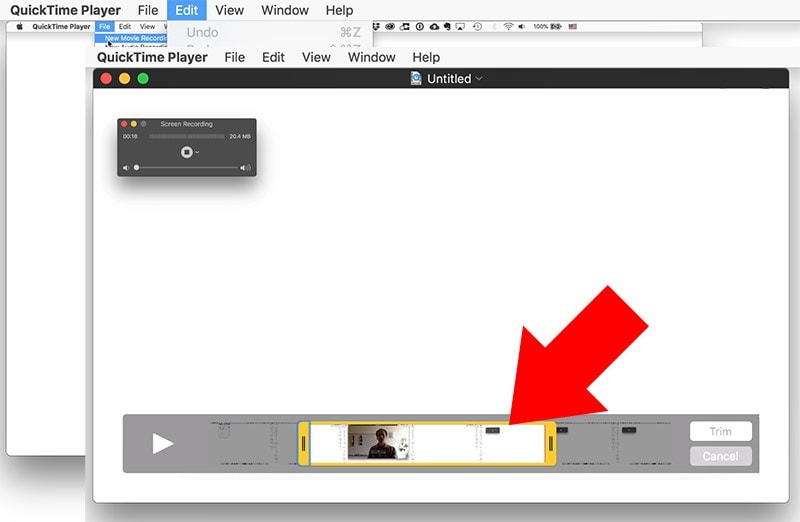
Step 2: Once the video file opens, go to Edit > Trim option. You can also press Command + T on your keyboard.
Step 3: You will see a yellow bar at the bottom containing the entire length of the video. In order to trim the video, you have to drag the handles from either side to trim out the unwanted parts. Therefore, after trimming, whatever the length of the video is there inside the yellow bar, the part of the video will remain and the out parts will be trimmed out.
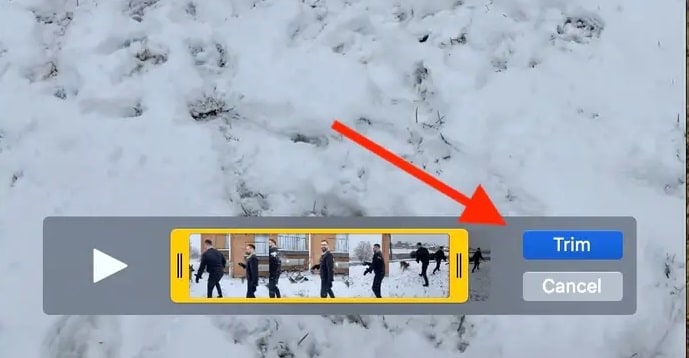
Step 4: You can preview the trimmed video by clicking the Play button beside the play icon. Once you are done, click on Trim button.
Step 5: If you are satisfied with the trimming work, go to File > Save to save the trimmed video file on your hard drive.
Part 3. QuickTime Alternative to Record and Edit Videos
QuickTime screen recording with audio is available for free of cost and you know that free things always come with some drawback. If you are not comfortable with QuickTime screen recording with sound and you are looking for a better alternative, we recommend Wondershare Filmora. Filmora for Mac is a professional screen recorder and video editor .
You can record the screen with audio in simple steps without any external extension. You can also edit any video starting from trimming and cropping to adding video effects and transitions, you can do all editing works without any complication. Here are the steps to record and edit any video on Filmora.
Step 1: Download and install Wondershare Filmora for Mac.
For Win 7 or later (64-bit)
For macOS 10.12 or later
Step 2: Launch Filmora and click on New Project.

Step 3: Go to Record menu and click on “Record PC Screen”.
Step 4: Set the configuration for screen size that you want to record. Make sure Speakers option is turned on which will record system audio automatically. If you want to record your voice, turn on Microphone option.
Step 5: Finally, click on the Record button to start recording the screen.

Step 6: Click on Stop button to stop recording whenever it is done.
Here are the steps to edit any video with Filmora.
Step 1: Launch Filmora and click on New Project.
Step 2: From Import menu, select Import with Instant Cutter Tool.
Step 3: Drag the imported file to your Timeline and you can import multiple videos and drop them on Timeline to rearrange and join them.
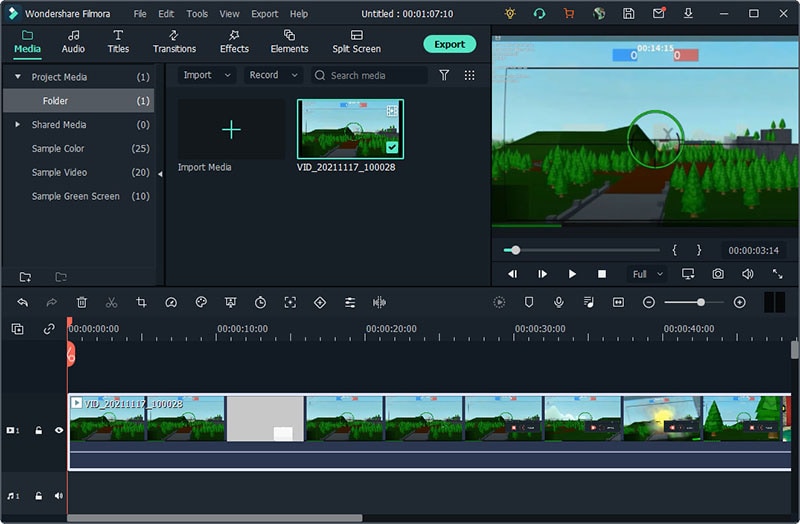
Step 4: If you want to trim the video, place the mouse point at the beginning or ending of the video from where you want to trim. When the trim icon appears, press and hold the mouse button and move forward or backward.
If the useless part is in the middle, you need to split the video using Scissor icon and apply the same method mentioned above to trim out unwanted parts.
Step 5: When you are done editing, click on Export and set all the parameters perfectly to save the video.
Conclusion
If you are a Mac user, QuickTime player screen recording with audio is available for free of cost for you to record your screen activities. However, you will need to install an external extension for QuickTime player screen recording audio. If you want a better alternative, we recommend Wondershare Filmora where you can record the screen with audio and edit any video in simple steps.
Part 1. Steps to Use QuickTime Record Screen and Audio
If you are going to record a video playing on your Mac, QuickTime is a great choice. You can record your screen perfectly but the only issue is that QuickTime player screen recording audio feature is not available. That does not mean you cannot record screen as well as audio with QuickTime. Here are the steps on QuickTime how to record screen with sound.
Step 1: You will have to install a free extension called SoundFlower so that you can record audio through QuickTime along with recording the screen. Therefore, download SoundFlower free extension software. The main job of SoundFlower is to channel the audio playing from one application to another. Install SoundFlower application on your Mac from the downloaded file.
Step 2: Once you have installed SoundFlower on your Mac, restart your computer. This will ensure that there is no issue with QuickTime screen recording with sound.
Step 3: Go to Apple menu and open System Preferences.
Step 4: Go to Sound tab and from Sound Output, select SoundFlower(2ch) option. This will make SoundFlower the active output by feeding the audio signal directly to SoundFlower instead of system speakers.
Step 5: Now, it is time for QuickTime player screen recording with audio. Launch QuickTime and go to File > New Screen Recording option.
Step 6: You can start recording anytime you want by pressing the Record button. Make sure that sound source is selected as SoundFlower(2ch) and quality is selected as high. You can record any video that you are playing on the browser as well as record your gameplay with audio.
Step 7: Once you are done recording, press the Stop button. You can go to File > Save option to save the recorded video file.
Once your recording is over, you should go to Apple Menu > System Preferences > Sound tab and select Sound Output as Internal Speakers.
Part 2. How to Trim Videos in QuickTime Player
You may need to trim out some parts of the video to get rid of the unwanted parts and keep only the important parts. You can do the trim work easily in QuickTime Player and here are the steps to follow.
Step 1: Launch QuickTime Player and go to File > Open File option. Select the video file that you want to trim.
Step 2: Once the video file opens, go to Edit > Trim option. You can also press Command + T on your keyboard.
Step 3: You will see a yellow bar at the bottom containing the entire length of the video. In order to trim the video, you have to drag the handles from either side to trim out the unwanted parts. Therefore, after trimming, whatever the length of the video is there inside the yellow bar, the part of the video will remain and the out parts will be trimmed out.
Step 4: You can preview the trimmed video by clicking the Play button beside the play icon. Once you are done, click on Trim button.
Step 5: If you are satisfied with the trimming work, go to File > Save to save the trimmed video file on your hard drive.
Part 3. QuickTime Alternative to Record and Edit Videos
QuickTime screen recording with audio is available for free of cost and you know that free things always come with some drawback. If you are not comfortable with QuickTime screen recording with sound and you are looking for a better alternative, we recommend Wondershare Filmora. Filmora for Mac is a professional screen recorder and video editor .
You can record the screen with audio in simple steps without any external extension. You can also edit any video starting from trimming and cropping to adding video effects and transitions, you can do all editing works without any complication. Here are the steps to record and edit any video on Filmora.
Step 1: Download and install Wondershare Filmora for Mac.
For Win 7 or later (64-bit)
For macOS 10.12 or later
Step 2: Launch Filmora and click on New Project.
Step 3: Go to Record menu and click on “Record PC Screen”.
Step 4: Set the configuration for screen size that you want to record. Make sure Speakers option is turned on which will record system audio automatically. If you want to record your voice, turn on Microphone option.
Step 5: Finally, click on the Record button to start recording the screen.
Step 6: Click on Stop button to stop recording whenever it is done.
Here are the steps to edit any video with Filmora.
Step 1: Launch Filmora and click on New Project.
Step 2: From Import menu, select Import with Instant Cutter Tool.
Step 3: Drag the imported file to your Timeline and you can import multiple videos and drop them on Timeline to rearrange and join them.
Step 4: If you want to trim the video, place the mouse point at the beginning or ending of the video from where you want to trim. When the trim icon appears, press and hold the mouse button and move forward or backward.
If the useless part is in the middle, you need to split the video using Scissor icon and apply the same method mentioned above to trim out unwanted parts.
Step 5: When you are done editing, click on Export and set all the parameters perfectly to save the video.
Conclusion
If you are a Mac user, QuickTime player screen recording with audio is available for free of cost for you to record your screen activities. However, you will need to install an external extension for QuickTime player screen recording audio. If you want a better alternative, we recommend Wondershare Filmora where you can record the screen with audio and edit any video in simple steps.
Also read:
- [New] In 2024, Farmers' Fantasy Top 10 Game Simulations Unveiled
- [New] In 2024, The Synergy of Slack and Filmora for Effective Scheduling
- [Updated] In 2024, Achieve Balance & Vitality - Top 10 Premium Yoga Streams
- [Updated] In 2024, Instant Clearing The Best iOS Apps for Precise Image Editing
- [Updated] Screen Recording Innovations A Comparative Look
- [Updated] Screen Shot Entire Page View for 2024
- 2024 Approved Digital Photography How to Erase Unwanted Areas
- In 2024, 5 Ways to Move Contacts From OnePlus 12 to iPhone (13/14/15) | Dr.fone
- In 2024, The Best Android Unlock Software For Realme C67 4G Device Top 5 Picks to Remove Android Locks
- Relaxation Station Leisurely Phone Game Guide
- Unlocking Administrator Rights for Your Home Win11/10
- Title: Swift Screen Tape with Sound Included
- Author: Mary Shelley
- Created at : 2025-01-10 00:20:01
- Updated at : 2025-01-14 01:34:00
- Link: https://screen-sharing-recording.techidaily.com/swift-screen-tape-with-sound-included/
- License: This work is licensed under CC BY-NC-SA 4.0.