![[New] Web's Frontier Leading Browsers for Screen Recording for 2024](https://thmb.techidaily.com/06629510e11e9d29470adf181e231bb23d34ab4b20d9291b76fb465837bc25f3.jpg)
"[New] Web's Frontier Leading Browsers for Screen Recording for 2024"
Web’s Frontier: Leading Browsers for Screen Recording
Screen recording is acquiring prevalence as experts need to record their PC screens on numerous events. With browser screen recorder, regardless of whether you’re giving walkthroughs to recently added team members, recording a customized item demo, settling a client ticket in help, or recording live web-based for YouTube, the browser recorders for chrome make processes simpler, useful, and more powerful. We’ll cover all that you want to have some familiarity with about screen recording programming. From what Features to search for dependent on your requirements and the various sorts of recorders you can browse. So, to make your life somewhat simpler, we will examine 5 top tools to record browser videos that assist you with settling on the most ideal decision.
In case you’re keeping watch for the ideal web-based browser screen recorder, it ought to be noticed that the market is overflowed with many choices and not all screen recording instruments will be able for your requirements. What mostly isolates screen recorders from one another are the watermarks, highlights, and quality. Most projects, by and large, should be paid to work ideally, however, there are a huge load of choices that offer excellent benefit for nothing. Screen record is a need for content makers, consultants, and educators, to give some examples. Thus, we’ve accumulated a rundown of the 5 best browser recorder chrome in 2021. You can likewise observe some to be useful hints underneath to ensure you record excellent recordings, so stick till the end!
1. Loom
Loom isn’t excessively confounded when it’s an ideal opportunity to record: you can pick whether you need to record simply your screen, your screen with webcam video, or your webcam. When you finish, your video will be transferred to Loom. You can do some essential altering in the program, assuming you need, or you can duplicate the connection to share the video. It’s all extremely speedy. It’s restricted, certain, however extraordinary for rapidly showing something to a colleague, associate, as well as chief rival. Furthermore, you can generally download your recordings and store them elsewhere in case you’re drawing near to that video edge limit.

Key Features:
- Loom lets you record any activity on browser with customizations.
- It also allows the audio recordings with the browser screen record
- Loom also gives you the choice to record your webcam with the browser screen
- It enables you to record over Zoom, Google Meet and other online platforms as well
- Lastly, you can also edit and share the recordings to various platforms.
How to Use Loom Browser Recorder
Step 1: Open Loom Extension
To start recording you need to click the Loom Icon and a pop-up window will appear. You can choose if you want to use your screen and webcam, or only your screen or only your webcam. Then you will have the option to record your full desktop screen or only your current tab.
Step 2: Start Recording
Below you will see the recording settings where you will be able to set up your microphone and webcam. And then you will see the Start Recording button. You can start recording your first Loom video!
Step 3: Share Your Recording
Right after finishing recording your video, a new tab on your screen will appear where you can grab a link to share or you can also share it directly on Facebook, Twitter, Gmail.

2. Screencastify
Being the mother of all program screen recorders, Screencastify has a great deal going for them. Their free arrangement permits on-screen composing, and the actual drawings track to your screen! That include alone feels like a superior instrument as of now. Instructors can utilize on-screen emoticons as well and square shapes to keep youngsters centered all through the video. The cool thing about Screencastify’s pens is that they track the region that you drew on. Screencastify expects you to sign into their foundation. You’re approached to sign in to your Google account, which can feel irritating in case you’re not the sort to handily connect your Google record to simply any site.
Screen recording with Screencastify just keeps going for as long as 5 minutes with the free form. In this way, you will battle with conveying total and exhaustive video briefs in that restricted measure of time. Their inherent supervisor just backings 5-minute video trades as well, so you can’t stack recordings on top of one another as a shoddy arrangement. Clients can pick between on-screen pens with various tones. These stay for all time on your screen until you either clear every one of the drawings or delete them with the eraser. Along these lines, on the off chance that you look all over, your drawings will scroll along with the window.
Features:
- Underlying video proofreader in the wake of recording
- Loads of highlights in the free arrangement
- Admittance to emoticons, square shapes, and single-hued pens for on-screen drawing
- Saves consequently to your Google Drive and is not difficult to share
- Flexible webcam size
How to Record with Screencastify Extension
Here we’ve enlisted step-by-step guide for Screencastify so you can perform browser recording with this extension:
Step 1: Launch the Screencastify Recorder
Open your browser and go through the screencastify screen recording site. Pick what sort of recording to take. The choices might incorporate a full-screen recording, halfway screen recording, a full site page recording, or a recording of a particular application window.
Step 2: Setup the Recording
Set some other choices, like video quality or a commencement. Turn on your sound, if material. Set your mouthpiece source. Turn on your webcam, if material. Set your webcam source. Snap the “begin recording” button to start recording,
Step 3: Stop and Save your Screen Recording
After you’ve done that, hit the record button and then, when finished, hit the “stop” button to save the recording of your browser.
Get started easily with Filmora’s powerful performance, intuitive interface, and countless effects!
Try It Free Try It Free Try It Free

3. Panopto
For secure individual screens, accounts use Panopto express screen recorder online as it doesn’t need any client record or Mastercard data, simply dispatch the application and start your recording. It is easier to understand and doesn’t request admittance to screen accounts thus treating your information as secret. Computerized subtitling doesn’t work precisely and needs improvement in this instrument.

Different screens can likewise be converted into one single unit with the assistance of this instrument to record remarkable recordings from different sources. Catch accounts and immediately share them on advanced stages with its moment sharing component. This instrument gives a shocking element of changing over your webcam into a savvy camera that chases after you and consequently zooms in and out for an expert video utilizing man-made brainpower innovation along these lines you can be a genius at recording talks, introductions, and video instructional exercises with Panopto express.
Features:
- Panopto offers a free internet-based screen recorder for everybody that you can access from any internet browser.
- With Panopto, you can make multi-stream accounts with webcam and sound.
- Panopto incorporates programmed inscribing and an auto-produced list of chapters for recordings.
- Panopto’s video altering highlights incorporate managing and inserted tests.
- The stage incorporates mixes with Zoom, WebEx Meetings, BlueJeans, and GoToMeeting so you can record work gatherings.
- You can live stream with Panopto to Facebook Live, Periscope, and YouTube. Panopto offers 5 hours of free video stockpiling.
How to Record with Panopto Extension
Let’s have a look at the Panopto browser recording. Here we’ve specified its step-by-step guide you need to perform after enabling the above extensions inside your browser. Let’s learn the steps:
Step 1: Install and Launch Panopto Extension
To begin with, go towards the chrome extensions page and from there, opt for the Panopto extension that’ll get installed inside your browser. Afterwards, open the extension as shown here:
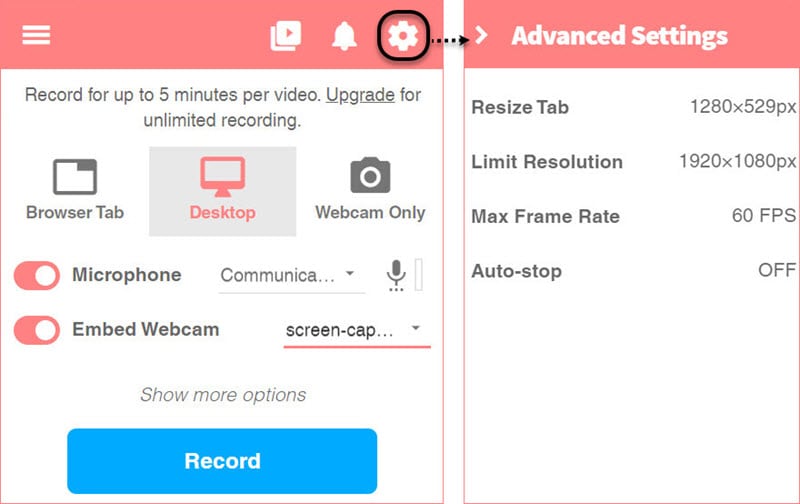
Step 2: Customize the Recording
After that, you can check and detect your microphone, webcam, and other settings indie the Panopto extension as shown here. Customize the settings from there and start the recording afterwards.
Step 3: Share your Recording
After you’ve done the recording, then hit the “stop” button and from there, Panopto lets you share the recording to their own platform or you can buy the subscription to utilize the recording further. You can also send your recordings to the Classrooms or the YouTube channel as well.
4. Screencast-o-Matic
Convert screen accounts into significant recordings for work, training, or individual stages with the assistance of Screencast-o-Matic online video recorder. Screencast-O-Matic not just permits you to catch your screen action yet, in addition, gives noteworthy Features of simple video altering, sound recording, and getting reinforcements. In any case, although this internet-based video recorder is allowed to utilize, a portion of the highlights need a membership.

Moreover, it additionally has a library loaded up with pictures that you can utilize while altering your recordings. It likewise offers video facilitating and prearranged accounts alongside various soundtracks and green screen impacts. Screenshot devices, draw and zoom include, and changing discourse over to message highlight is included Screencast-O-Matic online video recorder to help in making content like video instructional exercises, YouTube or Instagram recordings, and online recorded talks.
Features:
- You can get Screencast-O-Matic as a Chrome augmentation. While recording, you can draw on your screen.
- You can add a webcam and sound to your accounts. Webcam recording likewise accompanies a green-screen channel.
- You can add custom CTAs to your recordings.
- Screencast-O-Matic accompanies a library of music and audio cues that you can add to your recordings.
- You can manage your accounts and add inscriptions to them.
- You can add rich text, shapes, bolts, and pictures to your recordings and enliven overlays and changes.
How to Record with Screencast-o-Matic
Here we’ve performed a step-by-step guide of Screencast-o-Matic, you can perform after enabling the above extensions inside your browser. Let’s learn the steps to do that afterwards.
Step 1: Install and Launch Screencast-o-Matic Extension
Open your browser and from there, visit the Screencast-o-Matic website to download the extension for your browser. It’ll directly enable it after successful installation and then, you can open it right over your browser tab as shown here:
Step 2: Select the Recording Area
In the next step, when you’re over your browser tab screen, setup the various options including Webcam, Both screen and webcam, time limit, and other preferences inside the customizations tab. Right after that, Snap the red-colored “Rec” button to start recording,
Step 3: Edit and Save Recording
Right after the successful recording of the browser tab, Screencast-o-Matic lets you edit the recording so you can cut some unwanted parts as well as go through the final recording. After that, you can upload it to the Screencast-o-Matic server, or YouTube directly as well. As illustrated here:
5. Recordscreen.io
For online screen accounts on google chrome or Firefox use ScreenApp.IO. It is the easiest screen recorder web that permits you to quickly begin accounts with practically no establishment. Since it’s an online application, it just deals with Firefox, show, or chrome and you can’t utilize it on MAC.
Shared screens can likewise be recorded with this instrument so recording zoom gatherings is presently no issue. Because of its no establishment required component, it can quickly be utilized for corporate pieces of training and recording demo recordings in any setting. Regardless of whether you need to record an entire screen or simply a tab, it’s dependent upon you as ScreenApp.IO gives choice to pick. Additionally, it offers various sound choices too, for example, Browses sound, Microphone sound or No sound.
Features:
- You can record straightforwardly from recordscreen.io’s site or introduce the Chrome expansion.
- There are four choices for recording: screen just, webcam, screen and webcam, or sound as it were.
- You can add text and subtitles to your finished accounts.
- After recording, you can add overlays and cut between scenes.
- You can share your video by reordering its related connection.
- Watchers of your video can leave remarks on the web.
How to Record with Recordscreen.io Extension
To begin recording with Recordscreen.io, here we’ve brought you the steps you need to perform. Let’s learn the steps to do that afterwards.
Step 1: Launch the Recordscreen.io Extension
To begin with, open the browser and visit the “reocrdscreen.io” website directly. From there, you’ll get a Record button inside the tab as shown here:
Step 2: Setup and Start Recording
In the next step, you’ll be asked to choose the “Screen + Cam” or the “Screen Only”. After choosing your choice, hit the “Start Recording” button and from there, your recording will begin:
Step 3: Download your Screen Recording
Hit the Stop recording when you’re done recording your browser and the following interface will show up. You can download your video directly from there. As shown here:
The Bottom Line
The vast majority accept the nature of their recorded video would be as old as is shown on the screen. Nonetheless, that isn’t true as the nature of your recordings will contrast from each screen recorder device. Depending on it, having a decent altering instrument can be valuable as it erases undesirable video parts and achieve a cleaned search for the recordings. For that, we’ve enlisted the ease steps as well that might help you achieve the recording handily. Follow the steps above and take your lead in doing so on your own.
How to Use Loom Browser Recorder
Step 1: Open Loom Extension
To start recording you need to click the Loom Icon and a pop-up window will appear. You can choose if you want to use your screen and webcam, or only your screen or only your webcam. Then you will have the option to record your full desktop screen or only your current tab.
Step 2: Start Recording
Below you will see the recording settings where you will be able to set up your microphone and webcam. And then you will see the Start Recording button. You can start recording your first Loom video!
Step 3: Share Your Recording
Right after finishing recording your video, a new tab on your screen will appear where you can grab a link to share or you can also share it directly on Facebook, Twitter, Gmail.
2. Screencastify
Being the mother of all program screen recorders, Screencastify has a great deal going for them. Their free arrangement permits on-screen composing, and the actual drawings track to your screen! That include alone feels like a superior instrument as of now. Instructors can utilize on-screen emoticons as well and square shapes to keep youngsters centered all through the video. The cool thing about Screencastify’s pens is that they track the region that you drew on. Screencastify expects you to sign into their foundation. You’re approached to sign in to your Google account, which can feel irritating in case you’re not the sort to handily connect your Google record to simply any site.
Screen recording with Screencastify just keeps going for as long as 5 minutes with the free form. In this way, you will battle with conveying total and exhaustive video briefs in that restricted measure of time. Their inherent supervisor just backings 5-minute video trades as well, so you can’t stack recordings on top of one another as a shoddy arrangement. Clients can pick between on-screen pens with various tones. These stay for all time on your screen until you either clear every one of the drawings or delete them with the eraser. Along these lines, on the off chance that you look all over, your drawings will scroll along with the window.
Features:
- Underlying video proofreader in the wake of recording
- Loads of highlights in the free arrangement
- Admittance to emoticons, square shapes, and single-hued pens for on-screen drawing
- Saves consequently to your Google Drive and is not difficult to share
- Flexible webcam size
How to Record with Screencastify Extension
Here we’ve enlisted step-by-step guide for Screencastify so you can perform browser recording with this extension:
Step 1: Launch the Screencastify Recorder
Open your browser and go through the screencastify screen recording site. Pick what sort of recording to take. The choices might incorporate a full-screen recording, halfway screen recording, a full site page recording, or a recording of a particular application window.
Step 2: Setup the Recording
Set some other choices, like video quality or a commencement. Turn on your sound, if material. Set your mouthpiece source. Turn on your webcam, if material. Set your webcam source. Snap the “begin recording” button to start recording,
Step 3: Stop and Save your Screen Recording
After you’ve done that, hit the record button and then, when finished, hit the “stop” button to save the recording of your browser.
Get started easily with Filmora’s powerful performance, intuitive interface, and countless effects!
Try It Free Try It Free Try It Free
3. Panopto
For secure individual screens, accounts use Panopto express screen recorder online as it doesn’t need any client record or Mastercard data, simply dispatch the application and start your recording. It is easier to understand and doesn’t request admittance to screen accounts thus treating your information as secret. Computerized subtitling doesn’t work precisely and needs improvement in this instrument.
Different screens can likewise be converted into one single unit with the assistance of this instrument to record remarkable recordings from different sources. Catch accounts and immediately share them on advanced stages with its moment sharing component. This instrument gives a shocking element of changing over your webcam into a savvy camera that chases after you and consequently zooms in and out for an expert video utilizing man-made brainpower innovation along these lines you can be a genius at recording talks, introductions, and video instructional exercises with Panopto express.
Features:
- Panopto offers a free internet-based screen recorder for everybody that you can access from any internet browser.
- With Panopto, you can make multi-stream accounts with webcam and sound.
- Panopto incorporates programmed inscribing and an auto-produced list of chapters for recordings.
- Panopto’s video altering highlights incorporate managing and inserted tests.
- The stage incorporates mixes with Zoom, WebEx Meetings, BlueJeans, and GoToMeeting so you can record work gatherings.
- You can live stream with Panopto to Facebook Live, Periscope, and YouTube. Panopto offers 5 hours of free video stockpiling.
How to Record with Panopto Extension
Let’s have a look at the Panopto browser recording. Here we’ve specified its step-by-step guide you need to perform after enabling the above extensions inside your browser. Let’s learn the steps:
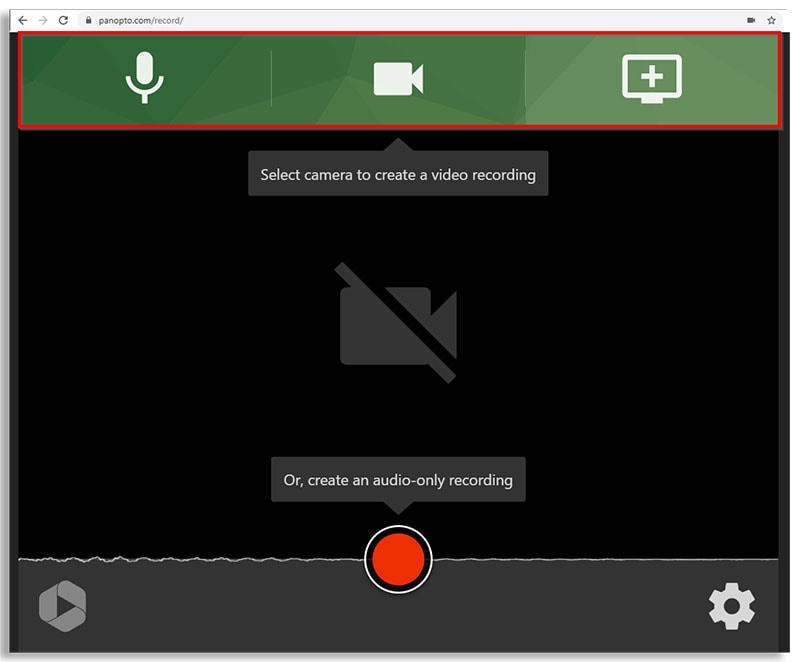
Step 1: Install and Launch Panopto Extension
To begin with, go towards the chrome extensions page and from there, opt for the Panopto extension that’ll get installed inside your browser. Afterwards, open the extension as shown here:
Step 2: Customize the Recording
After that, you can check and detect your microphone, webcam, and other settings indie the Panopto extension as shown here. Customize the settings from there and start the recording afterwards.
Step 3: Share your Recording
After you’ve done the recording, then hit the “stop” button and from there, Panopto lets you share the recording to their own platform or you can buy the subscription to utilize the recording further. You can also send your recordings to the Classrooms or the YouTube channel as well.
4. Screencast-o-Matic
Convert screen accounts into significant recordings for work, training, or individual stages with the assistance of Screencast-o-Matic online video recorder. Screencast-O-Matic not just permits you to catch your screen action yet, in addition, gives noteworthy Features of simple video altering, sound recording, and getting reinforcements. In any case, although this internet-based video recorder is allowed to utilize, a portion of the highlights need a membership.
Moreover, it additionally has a library loaded up with pictures that you can utilize while altering your recordings. It likewise offers video facilitating and prearranged accounts alongside various soundtracks and green screen impacts. Screenshot devices, draw and zoom include, and changing discourse over to message highlight is included Screencast-O-Matic online video recorder to help in making content like video instructional exercises, YouTube or Instagram recordings, and online recorded talks.
Features:
- You can get Screencast-O-Matic as a Chrome augmentation. While recording, you can draw on your screen.
- You can add a webcam and sound to your accounts. Webcam recording likewise accompanies a green-screen channel.
- You can add custom CTAs to your recordings.
- Screencast-O-Matic accompanies a library of music and audio cues that you can add to your recordings.
- You can manage your accounts and add inscriptions to them.
- You can add rich text, shapes, bolts, and pictures to your recordings and enliven overlays and changes.
How to Record with Screencast-o-Matic
Here we’ve performed a step-by-step guide of Screencast-o-Matic, you can perform after enabling the above extensions inside your browser. Let’s learn the steps to do that afterwards.
Step 1: Install and Launch Screencast-o-Matic Extension
Open your browser and from there, visit the Screencast-o-Matic website to download the extension for your browser. It’ll directly enable it after successful installation and then, you can open it right over your browser tab as shown here:
Step 2: Select the Recording Area
In the next step, when you’re over your browser tab screen, setup the various options including Webcam, Both screen and webcam, time limit, and other preferences inside the customizations tab. Right after that, Snap the red-colored “Rec” button to start recording,
Step 3: Edit and Save Recording
Right after the successful recording of the browser tab, Screencast-o-Matic lets you edit the recording so you can cut some unwanted parts as well as go through the final recording. After that, you can upload it to the Screencast-o-Matic server, or YouTube directly as well. As illustrated here:
5. Recordscreen.io
For online screen accounts on google chrome or Firefox use ScreenApp.IO. It is the easiest screen recorder web that permits you to quickly begin accounts with practically no establishment. Since it’s an online application, it just deals with Firefox, show, or chrome and you can’t utilize it on MAC.

Shared screens can likewise be recorded with this instrument so recording zoom gatherings is presently no issue. Because of its no establishment required component, it can quickly be utilized for corporate pieces of training and recording demo recordings in any setting. Regardless of whether you need to record an entire screen or simply a tab, it’s dependent upon you as ScreenApp.IO gives choice to pick. Additionally, it offers various sound choices too, for example, Browses sound, Microphone sound or No sound.
Features:
- You can record straightforwardly from recordscreen.io’s site or introduce the Chrome expansion.
- There are four choices for recording: screen just, webcam, screen and webcam, or sound as it were.
- You can add text and subtitles to your finished accounts.
- After recording, you can add overlays and cut between scenes.
- You can share your video by reordering its related connection.
- Watchers of your video can leave remarks on the web.
How to Record with Recordscreen.io Extension
To begin recording with Recordscreen.io, here we’ve brought you the steps you need to perform. Let’s learn the steps to do that afterwards.
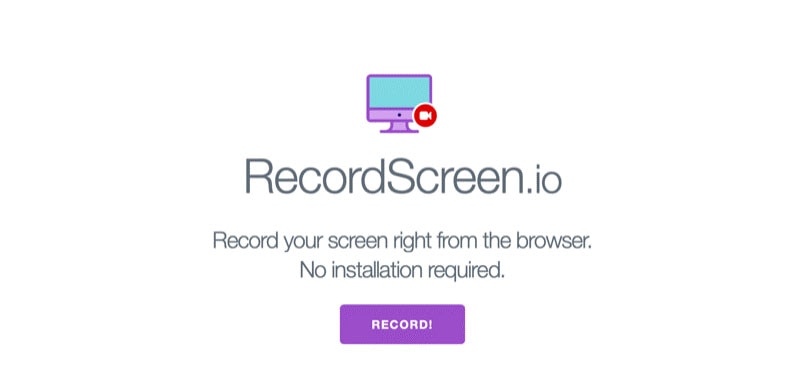
Step 1: Launch the Recordscreen.io Extension
To begin with, open the browser and visit the “reocrdscreen.io” website directly. From there, you’ll get a Record button inside the tab as shown here:
Step 2: Setup and Start Recording
In the next step, you’ll be asked to choose the “Screen + Cam” or the “Screen Only”. After choosing your choice, hit the “Start Recording” button and from there, your recording will begin:
Step 3: Download your Screen Recording
Hit the Stop recording when you’re done recording your browser and the following interface will show up. You can download your video directly from there. As shown here:
The Bottom Line
The vast majority accept the nature of their recorded video would be as old as is shown on the screen. Nonetheless, that isn’t true as the nature of your recordings will contrast from each screen recorder device. Depending on it, having a decent altering instrument can be valuable as it erases undesirable video parts and achieve a cleaned search for the recordings. For that, we’ve enlisted the ease steps as well that might help you achieve the recording handily. Follow the steps above and take your lead in doing so on your own.
How to Use Loom Browser Recorder
Step 1: Open Loom Extension
To start recording you need to click the Loom Icon and a pop-up window will appear. You can choose if you want to use your screen and webcam, or only your screen or only your webcam. Then you will have the option to record your full desktop screen or only your current tab.
Step 2: Start Recording
Below you will see the recording settings where you will be able to set up your microphone and webcam. And then you will see the Start Recording button. You can start recording your first Loom video!
Step 3: Share Your Recording
Right after finishing recording your video, a new tab on your screen will appear where you can grab a link to share or you can also share it directly on Facebook, Twitter, Gmail.
2. Screencastify
Being the mother of all program screen recorders, Screencastify has a great deal going for them. Their free arrangement permits on-screen composing, and the actual drawings track to your screen! That include alone feels like a superior instrument as of now. Instructors can utilize on-screen emoticons as well and square shapes to keep youngsters centered all through the video. The cool thing about Screencastify’s pens is that they track the region that you drew on. Screencastify expects you to sign into their foundation. You’re approached to sign in to your Google account, which can feel irritating in case you’re not the sort to handily connect your Google record to simply any site.
Screen recording with Screencastify just keeps going for as long as 5 minutes with the free form. In this way, you will battle with conveying total and exhaustive video briefs in that restricted measure of time. Their inherent supervisor just backings 5-minute video trades as well, so you can’t stack recordings on top of one another as a shoddy arrangement. Clients can pick between on-screen pens with various tones. These stay for all time on your screen until you either clear every one of the drawings or delete them with the eraser. Along these lines, on the off chance that you look all over, your drawings will scroll along with the window.
Features:
- Underlying video proofreader in the wake of recording
- Loads of highlights in the free arrangement
- Admittance to emoticons, square shapes, and single-hued pens for on-screen drawing
- Saves consequently to your Google Drive and is not difficult to share
- Flexible webcam size
How to Record with Screencastify Extension
Here we’ve enlisted step-by-step guide for Screencastify so you can perform browser recording with this extension:
Step 1: Launch the Screencastify Recorder
Open your browser and go through the screencastify screen recording site. Pick what sort of recording to take. The choices might incorporate a full-screen recording, halfway screen recording, a full site page recording, or a recording of a particular application window.
Step 2: Setup the Recording
Set some other choices, like video quality or a commencement. Turn on your sound, if material. Set your mouthpiece source. Turn on your webcam, if material. Set your webcam source. Snap the “begin recording” button to start recording,
Step 3: Stop and Save your Screen Recording
After you’ve done that, hit the record button and then, when finished, hit the “stop” button to save the recording of your browser.
Get started easily with Filmora’s powerful performance, intuitive interface, and countless effects!
Try It Free Try It Free Try It Free
3. Panopto
For secure individual screens, accounts use Panopto express screen recorder online as it doesn’t need any client record or Mastercard data, simply dispatch the application and start your recording. It is easier to understand and doesn’t request admittance to screen accounts thus treating your information as secret. Computerized subtitling doesn’t work precisely and needs improvement in this instrument.
Different screens can likewise be converted into one single unit with the assistance of this instrument to record remarkable recordings from different sources. Catch accounts and immediately share them on advanced stages with its moment sharing component. This instrument gives a shocking element of changing over your webcam into a savvy camera that chases after you and consequently zooms in and out for an expert video utilizing man-made brainpower innovation along these lines you can be a genius at recording talks, introductions, and video instructional exercises with Panopto express.
Features:
- Panopto offers a free internet-based screen recorder for everybody that you can access from any internet browser.
- With Panopto, you can make multi-stream accounts with webcam and sound.
- Panopto incorporates programmed inscribing and an auto-produced list of chapters for recordings.
- Panopto’s video altering highlights incorporate managing and inserted tests.
- The stage incorporates mixes with Zoom, WebEx Meetings, BlueJeans, and GoToMeeting so you can record work gatherings.
- You can live stream with Panopto to Facebook Live, Periscope, and YouTube. Panopto offers 5 hours of free video stockpiling.
How to Record with Panopto Extension
Let’s have a look at the Panopto browser recording. Here we’ve specified its step-by-step guide you need to perform after enabling the above extensions inside your browser. Let’s learn the steps:
Step 1: Install and Launch Panopto Extension
To begin with, go towards the chrome extensions page and from there, opt for the Panopto extension that’ll get installed inside your browser. Afterwards, open the extension as shown here:
Step 2: Customize the Recording
After that, you can check and detect your microphone, webcam, and other settings indie the Panopto extension as shown here. Customize the settings from there and start the recording afterwards.
Step 3: Share your Recording
After you’ve done the recording, then hit the “stop” button and from there, Panopto lets you share the recording to their own platform or you can buy the subscription to utilize the recording further. You can also send your recordings to the Classrooms or the YouTube channel as well.
Parental Control Software
## 4\. Screencast-o-MaticConvert screen accounts into significant recordings for work, training, or individual stages with the assistance of Screencast-o-Matic online video recorder. Screencast-O-Matic not just permits you to catch your screen action yet, in addition, gives noteworthy Features of simple video altering, sound recording, and getting reinforcements. In any case, although this internet-based video recorder is allowed to utilize, a portion of the highlights need a membership.
Moreover, it additionally has a library loaded up with pictures that you can utilize while altering your recordings. It likewise offers video facilitating and prearranged accounts alongside various soundtracks and green screen impacts. Screenshot devices, draw and zoom include, and changing discourse over to message highlight is included Screencast-O-Matic online video recorder to help in making content like video instructional exercises, YouTube or Instagram recordings, and online recorded talks.
Features:
- You can get Screencast-O-Matic as a Chrome augmentation. While recording, you can draw on your screen.
- You can add a webcam and sound to your accounts. Webcam recording likewise accompanies a green-screen channel.
- You can add custom CTAs to your recordings.
- Screencast-O-Matic accompanies a library of music and audio cues that you can add to your recordings.
- You can manage your accounts and add inscriptions to them.
- You can add rich text, shapes, bolts, and pictures to your recordings and enliven overlays and changes.
How to Record with Screencast-o-Matic
Here we’ve performed a step-by-step guide of Screencast-o-Matic, you can perform after enabling the above extensions inside your browser. Let’s learn the steps to do that afterwards.
Step 1: Install and Launch Screencast-o-Matic Extension
Open your browser and from there, visit the Screencast-o-Matic website to download the extension for your browser. It’ll directly enable it after successful installation and then, you can open it right over your browser tab as shown here:
Step 2: Select the Recording Area
In the next step, when you’re over your browser tab screen, setup the various options including Webcam, Both screen and webcam, time limit, and other preferences inside the customizations tab. Right after that, Snap the red-colored “Rec” button to start recording,
Step 3: Edit and Save Recording
Right after the successful recording of the browser tab, Screencast-o-Matic lets you edit the recording so you can cut some unwanted parts as well as go through the final recording. After that, you can upload it to the Screencast-o-Matic server, or YouTube directly as well. As illustrated here:
5. Recordscreen.io
For online screen accounts on google chrome or Firefox use ScreenApp.IO. It is the easiest screen recorder web that permits you to quickly begin accounts with practically no establishment. Since it’s an online application, it just deals with Firefox, show, or chrome and you can’t utilize it on MAC.
Shared screens can likewise be recorded with this instrument so recording zoom gatherings is presently no issue. Because of its no establishment required component, it can quickly be utilized for corporate pieces of training and recording demo recordings in any setting. Regardless of whether you need to record an entire screen or simply a tab, it’s dependent upon you as ScreenApp.IO gives choice to pick. Additionally, it offers various sound choices too, for example, Browses sound, Microphone sound or No sound.
Features:
- You can record straightforwardly from recordscreen.io’s site or introduce the Chrome expansion.
- There are four choices for recording: screen just, webcam, screen and webcam, or sound as it were.
- You can add text and subtitles to your finished accounts.
- After recording, you can add overlays and cut between scenes.
- You can share your video by reordering its related connection.
- Watchers of your video can leave remarks on the web.
How to Record with Recordscreen.io Extension
To begin recording with Recordscreen.io, here we’ve brought you the steps you need to perform. Let’s learn the steps to do that afterwards.
Step 1: Launch the Recordscreen.io Extension
To begin with, open the browser and visit the “reocrdscreen.io” website directly. From there, you’ll get a Record button inside the tab as shown here:
Step 2: Setup and Start Recording
In the next step, you’ll be asked to choose the “Screen + Cam” or the “Screen Only”. After choosing your choice, hit the “Start Recording” button and from there, your recording will begin:
Step 3: Download your Screen Recording
Hit the Stop recording when you’re done recording your browser and the following interface will show up. You can download your video directly from there. As shown here:
The Bottom Line
The vast majority accept the nature of their recorded video would be as old as is shown on the screen. Nonetheless, that isn’t true as the nature of your recordings will contrast from each screen recorder device. Depending on it, having a decent altering instrument can be valuable as it erases undesirable video parts and achieve a cleaned search for the recordings. For that, we’ve enlisted the ease steps as well that might help you achieve the recording handily. Follow the steps above and take your lead in doing so on your own.
How to Use Loom Browser Recorder
Step 1: Open Loom Extension
To start recording you need to click the Loom Icon and a pop-up window will appear. You can choose if you want to use your screen and webcam, or only your screen or only your webcam. Then you will have the option to record your full desktop screen or only your current tab.
Step 2: Start Recording
Below you will see the recording settings where you will be able to set up your microphone and webcam. And then you will see the Start Recording button. You can start recording your first Loom video!
Step 3: Share Your Recording
Right after finishing recording your video, a new tab on your screen will appear where you can grab a link to share or you can also share it directly on Facebook, Twitter, Gmail.
2. Screencastify
Being the mother of all program screen recorders, Screencastify has a great deal going for them. Their free arrangement permits on-screen composing, and the actual drawings track to your screen! That include alone feels like a superior instrument as of now. Instructors can utilize on-screen emoticons as well and square shapes to keep youngsters centered all through the video. The cool thing about Screencastify’s pens is that they track the region that you drew on. Screencastify expects you to sign into their foundation. You’re approached to sign in to your Google account, which can feel irritating in case you’re not the sort to handily connect your Google record to simply any site.
Screen recording with Screencastify just keeps going for as long as 5 minutes with the free form. In this way, you will battle with conveying total and exhaustive video briefs in that restricted measure of time. Their inherent supervisor just backings 5-minute video trades as well, so you can’t stack recordings on top of one another as a shoddy arrangement. Clients can pick between on-screen pens with various tones. These stay for all time on your screen until you either clear every one of the drawings or delete them with the eraser. Along these lines, on the off chance that you look all over, your drawings will scroll along with the window.
Features:
- Underlying video proofreader in the wake of recording
- Loads of highlights in the free arrangement
- Admittance to emoticons, square shapes, and single-hued pens for on-screen drawing
- Saves consequently to your Google Drive and is not difficult to share
- Flexible webcam size
How to Record with Screencastify Extension
Here we’ve enlisted step-by-step guide for Screencastify so you can perform browser recording with this extension:
Step 1: Launch the Screencastify Recorder
Open your browser and go through the screencastify screen recording site. Pick what sort of recording to take. The choices might incorporate a full-screen recording, halfway screen recording, a full site page recording, or a recording of a particular application window.
Step 2: Setup the Recording
Set some other choices, like video quality or a commencement. Turn on your sound, if material. Set your mouthpiece source. Turn on your webcam, if material. Set your webcam source. Snap the “begin recording” button to start recording,
Step 3: Stop and Save your Screen Recording
After you’ve done that, hit the record button and then, when finished, hit the “stop” button to save the recording of your browser.
Get started easily with Filmora’s powerful performance, intuitive interface, and countless effects!
Try It Free Try It Free Try It Free

3. Panopto
For secure individual screens, accounts use Panopto express screen recorder online as it doesn’t need any client record or Mastercard data, simply dispatch the application and start your recording. It is easier to understand and doesn’t request admittance to screen accounts thus treating your information as secret. Computerized subtitling doesn’t work precisely and needs improvement in this instrument.
Different screens can likewise be converted into one single unit with the assistance of this instrument to record remarkable recordings from different sources. Catch accounts and immediately share them on advanced stages with its moment sharing component. This instrument gives a shocking element of changing over your webcam into a savvy camera that chases after you and consequently zooms in and out for an expert video utilizing man-made brainpower innovation along these lines you can be a genius at recording talks, introductions, and video instructional exercises with Panopto express.
Features:
- Panopto offers a free internet-based screen recorder for everybody that you can access from any internet browser.
- With Panopto, you can make multi-stream accounts with webcam and sound.
- Panopto incorporates programmed inscribing and an auto-produced list of chapters for recordings.
- Panopto’s video altering highlights incorporate managing and inserted tests.
- The stage incorporates mixes with Zoom, WebEx Meetings, BlueJeans, and GoToMeeting so you can record work gatherings.
- You can live stream with Panopto to Facebook Live, Periscope, and YouTube. Panopto offers 5 hours of free video stockpiling.
How to Record with Panopto Extension
Let’s have a look at the Panopto browser recording. Here we’ve specified its step-by-step guide you need to perform after enabling the above extensions inside your browser. Let’s learn the steps:
Step 1: Install and Launch Panopto Extension
To begin with, go towards the chrome extensions page and from there, opt for the Panopto extension that’ll get installed inside your browser. Afterwards, open the extension as shown here:
Step 2: Customize the Recording
After that, you can check and detect your microphone, webcam, and other settings indie the Panopto extension as shown here. Customize the settings from there and start the recording afterwards.
Step 3: Share your Recording
After you’ve done the recording, then hit the “stop” button and from there, Panopto lets you share the recording to their own platform or you can buy the subscription to utilize the recording further. You can also send your recordings to the Classrooms or the YouTube channel as well.
4. Screencast-o-Matic
Convert screen accounts into significant recordings for work, training, or individual stages with the assistance of Screencast-o-Matic online video recorder. Screencast-O-Matic not just permits you to catch your screen action yet, in addition, gives noteworthy Features of simple video altering, sound recording, and getting reinforcements. In any case, although this internet-based video recorder is allowed to utilize, a portion of the highlights need a membership.
Moreover, it additionally has a library loaded up with pictures that you can utilize while altering your recordings. It likewise offers video facilitating and prearranged accounts alongside various soundtracks and green screen impacts. Screenshot devices, draw and zoom include, and changing discourse over to message highlight is included Screencast-O-Matic online video recorder to help in making content like video instructional exercises, YouTube or Instagram recordings, and online recorded talks.
Features:
- You can get Screencast-O-Matic as a Chrome augmentation. While recording, you can draw on your screen.
- You can add a webcam and sound to your accounts. Webcam recording likewise accompanies a green-screen channel.
- You can add custom CTAs to your recordings.
- Screencast-O-Matic accompanies a library of music and audio cues that you can add to your recordings.
- You can manage your accounts and add inscriptions to them.
- You can add rich text, shapes, bolts, and pictures to your recordings and enliven overlays and changes.
How to Record with Screencast-o-Matic
Here we’ve performed a step-by-step guide of Screencast-o-Matic, you can perform after enabling the above extensions inside your browser. Let’s learn the steps to do that afterwards.
Step 1: Install and Launch Screencast-o-Matic Extension
Open your browser and from there, visit the Screencast-o-Matic website to download the extension for your browser. It’ll directly enable it after successful installation and then, you can open it right over your browser tab as shown here:
Step 2: Select the Recording Area
In the next step, when you’re over your browser tab screen, setup the various options including Webcam, Both screen and webcam, time limit, and other preferences inside the customizations tab. Right after that, Snap the red-colored “Rec” button to start recording,
Step 3: Edit and Save Recording
Right after the successful recording of the browser tab, Screencast-o-Matic lets you edit the recording so you can cut some unwanted parts as well as go through the final recording. After that, you can upload it to the Screencast-o-Matic server, or YouTube directly as well. As illustrated here:
5. Recordscreen.io
For online screen accounts on google chrome or Firefox use ScreenApp.IO. It is the easiest screen recorder web that permits you to quickly begin accounts with practically no establishment. Since it’s an online application, it just deals with Firefox, show, or chrome and you can’t utilize it on MAC.
Shared screens can likewise be recorded with this instrument so recording zoom gatherings is presently no issue. Because of its no establishment required component, it can quickly be utilized for corporate pieces of training and recording demo recordings in any setting. Regardless of whether you need to record an entire screen or simply a tab, it’s dependent upon you as ScreenApp.IO gives choice to pick. Additionally, it offers various sound choices too, for example, Browses sound, Microphone sound or No sound.
Features:
- You can record straightforwardly from recordscreen.io’s site or introduce the Chrome expansion.
- There are four choices for recording: screen just, webcam, screen and webcam, or sound as it were.
- You can add text and subtitles to your finished accounts.
- After recording, you can add overlays and cut between scenes.
- You can share your video by reordering its related connection.
- Watchers of your video can leave remarks on the web.
How to Record with Recordscreen.io Extension
To begin recording with Recordscreen.io, here we’ve brought you the steps you need to perform. Let’s learn the steps to do that afterwards.
Step 1: Launch the Recordscreen.io Extension
To begin with, open the browser and visit the “reocrdscreen.io” website directly. From there, you’ll get a Record button inside the tab as shown here:
Step 2: Setup and Start Recording
In the next step, you’ll be asked to choose the “Screen + Cam” or the “Screen Only”. After choosing your choice, hit the “Start Recording” button and from there, your recording will begin:
Step 3: Download your Screen Recording
Hit the Stop recording when you’re done recording your browser and the following interface will show up. You can download your video directly from there. As shown here:
The Bottom Line
The vast majority accept the nature of their recorded video would be as old as is shown on the screen. Nonetheless, that isn’t true as the nature of your recordings will contrast from each screen recorder device. Depending on it, having a decent altering instrument can be valuable as it erases undesirable video parts and achieve a cleaned search for the recordings. For that, we’ve enlisted the ease steps as well that might help you achieve the recording handily. Follow the steps above and take your lead in doing so on your own.
- Title: [New] Web's Frontier Leading Browsers for Screen Recording for 2024
- Author: Mary Shelley
- Created at : 2024-07-19 08:07:17
- Updated at : 2024-07-20 08:07:17
- Link: https://screen-sharing-recording.techidaily.com/new-webs-frontier-leading-browsers-for-screen-recording-for-2024/
- License: This work is licensed under CC BY-NC-SA 4.0.