
"Elevate Your Video - Remove Extraneous Details Effectively for 2024"
Elevate Your Video - Remove Extraneous Details Effectively
How to Remove or Replace the Background in Logitech

Max Wales
Mar 27, 2024• Proven solutions
Screencasts require narration in order to be effective, and for that reason, YouTubers and eLearning content producers constantly feature themselves in tutorials and gaming videos. Webcams are commonly used during screen recording sessions, to capture the footage of the narrator, but a simple mistake like, not paying attention to the video’s background can ruin a perfectly captured webcam video.
Besides removing the messy backgrounds, you can also add templates or custom made backgrounds to webcam videos if you would like to hide private information, put the accent on the narrator of the video or improve its overall quality. In this guide, we are going to show you how to replace or remove the background while you are recording webcam videos with Logitech webcam.
![]()

The All-in-One Screen Recorder & Video Editor
- Record PC screen , voiceover, and webcam simultaneously
- Edit recorded clips quickly with a wide range of professional tools
- Built-in plentiful templates and effects
- Export to MP4, MOV, MKV, GIF and multiple formats
For Win 7 or later (64-bit)
For macOS 10.12 or later
 Secure Download
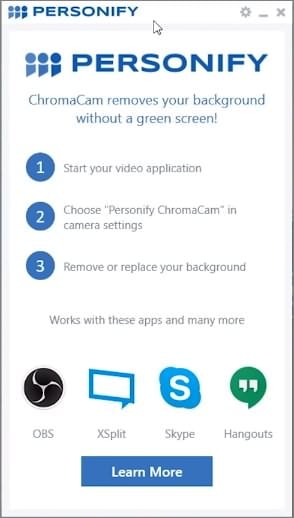
How to replace and remove the background with Personify ChromaCam software

ChromaCam for Logitech Webcam
Before you can start customizing the backgrounds of your webcam videos, there are a few preparation steps you have to take. Currently, Personify ChromaCam is available only on the Windows operating system, so Mac users can’t install the software even if they own a Logitech C992 Pro Stream webcam and BRIO 4K Pro Webcam. If you purchased these webcam models, you will be asked if you want to install the Personify ChromaCam software for free when you connect the webcam to a computer for the first time.
Note: You can download the software from the ChromaCamwebsite if you are not using the Logitech C922 or BRIO 4K webcam. ChromaCam works with all 2D webcams, but you may need to pay.
The software’s tech specs are not demanding, but you’ll still need to have at least Windows 7, or a more recent version of the Windows OS installed on your PC as well as an Intel or AMD Processor and 4GB of RAM memory. ChromaCam is optimized for 64-bit Windows, although it can work on 32-bit version of the OS, and the software can only be used with processors included in the Intel AVX Set. Personify ChromaCam is compatible with a lot of video chatting apps and broadcasting software products, including Skype, OBS Studio, XSplit Broadcaster software (we will take it for example in this article) , Google Hangouts, GameShow or Twitch, to mention a few.
Regardless of the software, you’re using with ChromaCam, the setup process is fairly simple and it includes only a few easy steps. We are going to show how you can replace and remove backgrounds with Personify ChromaCam using the Logitech C922 Pro Stream webcam.
Step 1 – Download & Install ChromaCam software
Connect the webcam to your PC, and install the ChromaCam software. If for some reason your Logitech C922 Pro Stream webcam doesn’t provide this option, you can download the software from theLogitech’s customer support page.

Personify ChromaCam works as an add-on for screencasting and broadcasting software products, that allows you to select a new background for the webcam video. The background removal and replacement features the ChromaCam offers enable users to combine several sources of videos while broadcasting live on the Internet’s most popular video streaming platforms.
The free version of ChromaCam adds watermarks to all videos, and you must pay a $29,99 one-time fee to remove them. However, the free version of the software that comes bundled with Logitech C922 Pro Stream webcam doesn’t create watermarks.
When the ChromaCam software is successfully installed on your PC, and after you’ve made sure that the webcam is working properly, you can launch the XSplit Broadcaster. If you haven’t installed this software on your PC yet, you can click here to start the installation process.
Step 2 - Setting up a new recording session
Once the XSplit software opens, you should head to the Add Source menu, and then select the Personify ChormaCam from the Webcam, capture card, video devices drop-down list. The Personify window will pop-up on the screen, and you’ll be able to select a new background for the webcam video by clicking on the templates featured in the Personify window.
If you’d like to adjust the video recording settings, you should right-click on the C922 Pro Stream webcam and open the Configure drop-down menu. Select the Video Output feature, and proceed to pick the Color Space Compression, Frame Rato or the Output size. The Video Input option in the Configure menu, grants you access to Logitech’s Camera Settings for the webcam and enables you to activate the Low Light Compensation feature, that improves the C922 Pro Stream’s performance in low-light conditions.
Step 3 - Selecting the background removal and replacement options
In the ChromaCam window, you can select a transparent background option if you would like to blend the figure into the screen recording or some of the template backgrounds that make the narrator stand out against the background. The software allows you to import custom made backgrounds by clicking on the plus icon in the Personify ChromaCam window.
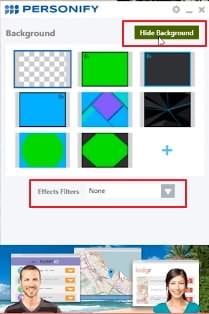
Making sure that the figure in the webcam video is properly cropped is the most important part of the process because badly cropped videos reveal too much of the previous background. The software’s cropping precision is limited, although the Personify ChromaCam provides tools that make the figure’s edges smoother.
Step 4 - Recording with ChromaCam
Before you start a new broadcast or a screen recording by clicking on their icons on the XSplit’s top bar, make sure that you are properly positioned and that the webcam is directed towards you. The Personify ChromaCam focuses on the head and torso of the figure in the video, so try not to move too much. The new background cuts out the parts of the figure that go out into the area of the background that has been replaced or removed, which can produce an awkward visual effect
You can pause or stop recording with a single click and all you’ll be able to find your videos in the XSplit’s Recordings tab.
You can also use this software in other screen recording software, please share with us how it works for you in the comment below.
Tips for better background replacement
Changing or removing the background in a webcam video is easy, but there a few things you can do to ensure that all webcam videos created with Personify ChromaCam software meet the highest visual standards.
1. Use simple monochrome backgrounds
Complex backgrounds that contain a lot of details should be avoided at all cost because the software won’t know which part of the screen you want to replace. A minimalistic, clean working background that doesn’t contain anything that might distract the viewer or the software, will make it easier for the software to place an outline around the figure and separate it from the rest of the image.

2. Find the right balance between the performance and video quality
Logitech C922 can capture videos at 60 fps in 720p resolution when used with Personify ChromaCam, but the software also enables you to reduce the screen recording quality you’re producing and increase the quality of the webcam footage. Click on the Setting icon in the Personify window and then just drag the Performance VS Quality slider to improve the quality of the footage produced by ChromaCam. However, lowering the video quality will also decrease the frame rate, so your screen recordings may not be as smooth as they would be if they were captured at the maximum resolution.
3. Use professional lighting equipment
Logitech C922 webcam performs remarkably well, even under difficult light conditions, but having enough light in the shot will guarantee that the video meets the conventional quality standards. Webcam videos captured under low-light conditions are often blurry and the person featured in the video is hard to recognize. That’s the reason why you should always strive to have a sufficient amount of light in the webcam video, so the ChromaCam software can easily place an outline around the figure in the video. Using more than one spotlight to light the scene can help you remove the shadows cast by a Persona in the video because shadows can make the background removal software less efficient.

Max Wales
Max Wales is a writer and a lover of all things video.
Follow @Max Wales
Max Wales
Mar 27, 2024• Proven solutions
Screencasts require narration in order to be effective, and for that reason, YouTubers and eLearning content producers constantly feature themselves in tutorials and gaming videos. Webcams are commonly used during screen recording sessions, to capture the footage of the narrator, but a simple mistake like, not paying attention to the video’s background can ruin a perfectly captured webcam video.
Besides removing the messy backgrounds, you can also add templates or custom made backgrounds to webcam videos if you would like to hide private information, put the accent on the narrator of the video or improve its overall quality. In this guide, we are going to show you how to replace or remove the background while you are recording webcam videos with Logitech webcam.
![]()
The All-in-One Screen Recorder & Video Editor
- Record PC screen , voiceover, and webcam simultaneously
- Edit recorded clips quickly with a wide range of professional tools
- Built-in plentiful templates and effects
- Export to MP4, MOV, MKV, GIF and multiple formats
For Win 7 or later (64-bit)
For macOS 10.12 or later
Secure Download
How to replace and remove the background with Personify ChromaCam software
ChromaCam for Logitech Webcam
Before you can start customizing the backgrounds of your webcam videos, there are a few preparation steps you have to take. Currently, Personify ChromaCam is available only on the Windows operating system, so Mac users can’t install the software even if they own a Logitech C992 Pro Stream webcam and BRIO 4K Pro Webcam. If you purchased these webcam models, you will be asked if you want to install the Personify ChromaCam software for free when you connect the webcam to a computer for the first time.
Note: You can download the software from the ChromaCamwebsite if you are not using the Logitech C922 or BRIO 4K webcam. ChromaCam works with all 2D webcams, but you may need to pay.
The software’s tech specs are not demanding, but you’ll still need to have at least Windows 7, or a more recent version of the Windows OS installed on your PC as well as an Intel or AMD Processor and 4GB of RAM memory. ChromaCam is optimized for 64-bit Windows, although it can work on 32-bit version of the OS, and the software can only be used with processors included in the Intel AVX Set. Personify ChromaCam is compatible with a lot of video chatting apps and broadcasting software products, including Skype, OBS Studio, XSplit Broadcaster software (we will take it for example in this article) , Google Hangouts, GameShow or Twitch, to mention a few.
Regardless of the software, you’re using with ChromaCam, the setup process is fairly simple and it includes only a few easy steps. We are going to show how you can replace and remove backgrounds with Personify ChromaCam using the Logitech C922 Pro Stream webcam.
Step 1 – Download & Install ChromaCam software
Connect the webcam to your PC, and install the ChromaCam software. If for some reason your Logitech C922 Pro Stream webcam doesn’t provide this option, you can download the software from theLogitech’s customer support page.
 Power Tools add-on for Google Sheets, 12-month subscription
Personify ChromaCam works as an add-on for screencasting and broadcasting software products, that allows you to select a new background for the webcam video. The background removal and replacement features the ChromaCam offers enable users to combine several sources of videos while broadcasting live on the Internet’s most popular video streaming platforms.
The free version of ChromaCam adds watermarks to all videos, and you must pay a $29,99 one-time fee to remove them. However, the free version of the software that comes bundled with Logitech C922 Pro Stream webcam doesn’t create watermarks.
When the ChromaCam software is successfully installed on your PC, and after you’ve made sure that the webcam is working properly, you can launch the XSplit Broadcaster. If you haven’t installed this software on your PC yet, you can click here to start the installation process.
Step 2 - Setting up a new recording session
Once the XSplit software opens, you should head to the Add Source menu, and then select the Personify ChormaCam from the Webcam, capture card, video devices drop-down list. The Personify window will pop-up on the screen, and you’ll be able to select a new background for the webcam video by clicking on the templates featured in the Personify window.
If you’d like to adjust the video recording settings, you should right-click on the C922 Pro Stream webcam and open the Configure drop-down menu. Select the Video Output feature, and proceed to pick the Color Space Compression, Frame Rato or the Output size. The Video Input option in the Configure menu, grants you access to Logitech’s Camera Settings for the webcam and enables you to activate the Low Light Compensation feature, that improves the C922 Pro Stream’s performance in low-light conditions.
Step 3 - Selecting the background removal and replacement options
In the ChromaCam window, you can select a transparent background option if you would like to blend the figure into the screen recording or some of the template backgrounds that make the narrator stand out against the background. The software allows you to import custom made backgrounds by clicking on the plus icon in the Personify ChromaCam window.
Making sure that the figure in the webcam video is properly cropped is the most important part of the process because badly cropped videos reveal too much of the previous background. The software’s cropping precision is limited, although the Personify ChromaCam provides tools that make the figure’s edges smoother.
Step 4 - Recording with ChromaCam
Before you start a new broadcast or a screen recording by clicking on their icons on the XSplit’s top bar, make sure that you are properly positioned and that the webcam is directed towards you. The Personify ChromaCam focuses on the head and torso of the figure in the video, so try not to move too much. The new background cuts out the parts of the figure that go out into the area of the background that has been replaced or removed, which can produce an awkward visual effect
You can pause or stop recording with a single click and all you’ll be able to find your videos in the XSplit’s Recordings tab.
You can also use this software in other screen recording software, please share with us how it works for you in the comment below.
Tips for better background replacement
Changing or removing the background in a webcam video is easy, but there a few things you can do to ensure that all webcam videos created with Personify ChromaCam software meet the highest visual standards.
1. Use simple monochrome backgrounds
Complex backgrounds that contain a lot of details should be avoided at all cost because the software won’t know which part of the screen you want to replace. A minimalistic, clean working background that doesn’t contain anything that might distract the viewer or the software, will make it easier for the software to place an outline around the figure and separate it from the rest of the image.

2. Find the right balance between the performance and video quality
Logitech C922 can capture videos at 60 fps in 720p resolution when used with Personify ChromaCam, but the software also enables you to reduce the screen recording quality you’re producing and increase the quality of the webcam footage. Click on the Setting icon in the Personify window and then just drag the Performance VS Quality slider to improve the quality of the footage produced by ChromaCam. However, lowering the video quality will also decrease the frame rate, so your screen recordings may not be as smooth as they would be if they were captured at the maximum resolution.
3. Use professional lighting equipment
Logitech C922 webcam performs remarkably well, even under difficult light conditions, but having enough light in the shot will guarantee that the video meets the conventional quality standards. Webcam videos captured under low-light conditions are often blurry and the person featured in the video is hard to recognize. That’s the reason why you should always strive to have a sufficient amount of light in the webcam video, so the ChromaCam software can easily place an outline around the figure in the video. Using more than one spotlight to light the scene can help you remove the shadows cast by a Persona in the video because shadows can make the background removal software less efficient.
 LYRX is an easy-to-use karaoke software with the professional features karaoke hosts need to perform with precision. LYRX is karaoke show hosting software that supports all standard karaoke file types as well as HD video formats, and it’s truly fun to use.
Max Wales
Max Wales is a writer and a lover of all things video.
Follow @Max Wales
Max Wales
Mar 27, 2024• Proven solutions
Screencasts require narration in order to be effective, and for that reason, YouTubers and eLearning content producers constantly feature themselves in tutorials and gaming videos. Webcams are commonly used during screen recording sessions, to capture the footage of the narrator, but a simple mistake like, not paying attention to the video’s background can ruin a perfectly captured webcam video.
Besides removing the messy backgrounds, you can also add templates or custom made backgrounds to webcam videos if you would like to hide private information, put the accent on the narrator of the video or improve its overall quality. In this guide, we are going to show you how to replace or remove the background while you are recording webcam videos with Logitech webcam.
![]()
The All-in-One Screen Recorder & Video Editor
- Record PC screen , voiceover, and webcam simultaneously
- Edit recorded clips quickly with a wide range of professional tools
- Built-in plentiful templates and effects
- Export to MP4, MOV, MKV, GIF and multiple formats
For Win 7 or later (64-bit)
For macOS 10.12 or later
Secure Download
How to replace and remove the background with Personify ChromaCam software
ChromaCam for Logitech Webcam
Before you can start customizing the backgrounds of your webcam videos, there are a few preparation steps you have to take. Currently, Personify ChromaCam is available only on the Windows operating system, so Mac users can’t install the software even if they own a Logitech C992 Pro Stream webcam and BRIO 4K Pro Webcam. If you purchased these webcam models, you will be asked if you want to install the Personify ChromaCam software for free when you connect the webcam to a computer for the first time.
Note: You can download the software from the ChromaCamwebsite if you are not using the Logitech C922 or BRIO 4K webcam. ChromaCam works with all 2D webcams, but you may need to pay.
The software’s tech specs are not demanding, but you’ll still need to have at least Windows 7, or a more recent version of the Windows OS installed on your PC as well as an Intel or AMD Processor and 4GB of RAM memory. ChromaCam is optimized for 64-bit Windows, although it can work on 32-bit version of the OS, and the software can only be used with processors included in the Intel AVX Set. Personify ChromaCam is compatible with a lot of video chatting apps and broadcasting software products, including Skype, OBS Studio, XSplit Broadcaster software (we will take it for example in this article) , Google Hangouts, GameShow or Twitch, to mention a few.
Regardless of the software, you’re using with ChromaCam, the setup process is fairly simple and it includes only a few easy steps. We are going to show how you can replace and remove backgrounds with Personify ChromaCam using the Logitech C922 Pro Stream webcam.
Step 1 – Download & Install ChromaCam software
Connect the webcam to your PC, and install the ChromaCam software. If for some reason your Logitech C922 Pro Stream webcam doesn’t provide this option, you can download the software from theLogitech’s customer support page.
Personify ChromaCam works as an add-on for screencasting and broadcasting software products, that allows you to select a new background for the webcam video. The background removal and replacement features the ChromaCam offers enable users to combine several sources of videos while broadcasting live on the Internet’s most popular video streaming platforms.
The free version of ChromaCam adds watermarks to all videos, and you must pay a $29,99 one-time fee to remove them. However, the free version of the software that comes bundled with Logitech C922 Pro Stream webcam doesn’t create watermarks.
When the ChromaCam software is successfully installed on your PC, and after you’ve made sure that the webcam is working properly, you can launch the XSplit Broadcaster. If you haven’t installed this software on your PC yet, you can click here to start the installation process.
Step 2 - Setting up a new recording session
Once the XSplit software opens, you should head to the Add Source menu, and then select the Personify ChormaCam from the Webcam, capture card, video devices drop-down list. The Personify window will pop-up on the screen, and you’ll be able to select a new background for the webcam video by clicking on the templates featured in the Personify window.
If you’d like to adjust the video recording settings, you should right-click on the C922 Pro Stream webcam and open the Configure drop-down menu. Select the Video Output feature, and proceed to pick the Color Space Compression, Frame Rato or the Output size. The Video Input option in the Configure menu, grants you access to Logitech’s Camera Settings for the webcam and enables you to activate the Low Light Compensation feature, that improves the C922 Pro Stream’s performance in low-light conditions.
Step 3 - Selecting the background removal and replacement options
In the ChromaCam window, you can select a transparent background option if you would like to blend the figure into the screen recording or some of the template backgrounds that make the narrator stand out against the background. The software allows you to import custom made backgrounds by clicking on the plus icon in the Personify ChromaCam window.
Making sure that the figure in the webcam video is properly cropped is the most important part of the process because badly cropped videos reveal too much of the previous background. The software’s cropping precision is limited, although the Personify ChromaCam provides tools that make the figure’s edges smoother.
Step 4 - Recording with ChromaCam
Before you start a new broadcast or a screen recording by clicking on their icons on the XSplit’s top bar, make sure that you are properly positioned and that the webcam is directed towards you. The Personify ChromaCam focuses on the head and torso of the figure in the video, so try not to move too much. The new background cuts out the parts of the figure that go out into the area of the background that has been replaced or removed, which can produce an awkward visual effect
You can pause or stop recording with a single click and all you’ll be able to find your videos in the XSplit’s Recordings tab.
You can also use this software in other screen recording software, please share with us how it works for you in the comment below.
Tips for better background replacement
Changing or removing the background in a webcam video is easy, but there a few things you can do to ensure that all webcam videos created with Personify ChromaCam software meet the highest visual standards.
1. Use simple monochrome backgrounds
Complex backgrounds that contain a lot of details should be avoided at all cost because the software won’t know which part of the screen you want to replace. A minimalistic, clean working background that doesn’t contain anything that might distract the viewer or the software, will make it easier for the software to place an outline around the figure and separate it from the rest of the image.
2. Find the right balance between the performance and video quality
Logitech C922 can capture videos at 60 fps in 720p resolution when used with Personify ChromaCam, but the software also enables you to reduce the screen recording quality you’re producing and increase the quality of the webcam footage. Click on the Setting icon in the Personify window and then just drag the Performance VS Quality slider to improve the quality of the footage produced by ChromaCam. However, lowering the video quality will also decrease the frame rate, so your screen recordings may not be as smooth as they would be if they were captured at the maximum resolution.
3. Use professional lighting equipment
Logitech C922 webcam performs remarkably well, even under difficult light conditions, but having enough light in the shot will guarantee that the video meets the conventional quality standards. Webcam videos captured under low-light conditions are often blurry and the person featured in the video is hard to recognize. That’s the reason why you should always strive to have a sufficient amount of light in the webcam video, so the ChromaCam software can easily place an outline around the figure in the video. Using more than one spotlight to light the scene can help you remove the shadows cast by a Persona in the video because shadows can make the background removal software less efficient.

Max Wales
Max Wales is a writer and a lover of all things video.
Follow @Max Wales
Max Wales
Mar 27, 2024• Proven solutions
Screencasts require narration in order to be effective, and for that reason, YouTubers and eLearning content producers constantly feature themselves in tutorials and gaming videos. Webcams are commonly used during screen recording sessions, to capture the footage of the narrator, but a simple mistake like, not paying attention to the video’s background can ruin a perfectly captured webcam video.
Besides removing the messy backgrounds, you can also add templates or custom made backgrounds to webcam videos if you would like to hide private information, put the accent on the narrator of the video or improve its overall quality. In this guide, we are going to show you how to replace or remove the background while you are recording webcam videos with Logitech webcam.
 PDF application, powered by AI-based OCR, for unified workflows with both digital and scanned documents.
 ![]()
The All-in-One Screen Recorder & Video Editor
- Record PC screen , voiceover, and webcam simultaneously
- Edit recorded clips quickly with a wide range of professional tools
- Built-in plentiful templates and effects
- Export to MP4, MOV, MKV, GIF and multiple formats
For Win 7 or later (64-bit)
For macOS 10.12 or later
Secure Download
How to replace and remove the background with Personify ChromaCam software
ChromaCam for Logitech Webcam
Before you can start customizing the backgrounds of your webcam videos, there are a few preparation steps you have to take. Currently, Personify ChromaCam is available only on the Windows operating system, so Mac users can’t install the software even if they own a Logitech C992 Pro Stream webcam and BRIO 4K Pro Webcam. If you purchased these webcam models, you will be asked if you want to install the Personify ChromaCam software for free when you connect the webcam to a computer for the first time.
Note: You can download the software from the ChromaCamwebsite if you are not using the Logitech C922 or BRIO 4K webcam. ChromaCam works with all 2D webcams, but you may need to pay.
The software’s tech specs are not demanding, but you’ll still need to have at least Windows 7, or a more recent version of the Windows OS installed on your PC as well as an Intel or AMD Processor and 4GB of RAM memory. ChromaCam is optimized for 64-bit Windows, although it can work on 32-bit version of the OS, and the software can only be used with processors included in the Intel AVX Set. Personify ChromaCam is compatible with a lot of video chatting apps and broadcasting software products, including Skype, OBS Studio, XSplit Broadcaster software (we will take it for example in this article) , Google Hangouts, GameShow or Twitch, to mention a few.
Regardless of the software, you’re using with ChromaCam, the setup process is fairly simple and it includes only a few easy steps. We are going to show how you can replace and remove backgrounds with Personify ChromaCam using the Logitech C922 Pro Stream webcam.
Step 1 – Download & Install ChromaCam software
Connect the webcam to your PC, and install the ChromaCam software. If for some reason your Logitech C922 Pro Stream webcam doesn’t provide this option, you can download the software from theLogitech’s customer support page.
Personify ChromaCam works as an add-on for screencasting and broadcasting software products, that allows you to select a new background for the webcam video. The background removal and replacement features the ChromaCam offers enable users to combine several sources of videos while broadcasting live on the Internet’s most popular video streaming platforms.
The free version of ChromaCam adds watermarks to all videos, and you must pay a $29,99 one-time fee to remove them. However, the free version of the software that comes bundled with Logitech C922 Pro Stream webcam doesn’t create watermarks.
When the ChromaCam software is successfully installed on your PC, and after you’ve made sure that the webcam is working properly, you can launch the XSplit Broadcaster. If you haven’t installed this software on your PC yet, you can click here to start the installation process.
Step 2 - Setting up a new recording session
Once the XSplit software opens, you should head to the Add Source menu, and then select the Personify ChormaCam from the Webcam, capture card, video devices drop-down list. The Personify window will pop-up on the screen, and you’ll be able to select a new background for the webcam video by clicking on the templates featured in the Personify window.
If you’d like to adjust the video recording settings, you should right-click on the C922 Pro Stream webcam and open the Configure drop-down menu. Select the Video Output feature, and proceed to pick the Color Space Compression, Frame Rato or the Output size. The Video Input option in the Configure menu, grants you access to Logitech’s Camera Settings for the webcam and enables you to activate the Low Light Compensation feature, that improves the C922 Pro Stream’s performance in low-light conditions.
Step 3 - Selecting the background removal and replacement options
In the ChromaCam window, you can select a transparent background option if you would like to blend the figure into the screen recording or some of the template backgrounds that make the narrator stand out against the background. The software allows you to import custom made backgrounds by clicking on the plus icon in the Personify ChromaCam window.
.png) Kanto Player Professional
Kanto Player Professional
Making sure that the figure in the webcam video is properly cropped is the most important part of the process because badly cropped videos reveal too much of the previous background. The software’s cropping precision is limited, although the Personify ChromaCam provides tools that make the figure’s edges smoother.
Step 4 - Recording with ChromaCam
Before you start a new broadcast or a screen recording by clicking on their icons on the XSplit’s top bar, make sure that you are properly positioned and that the webcam is directed towards you. The Personify ChromaCam focuses on the head and torso of the figure in the video, so try not to move too much. The new background cuts out the parts of the figure that go out into the area of the background that has been replaced or removed, which can produce an awkward visual effect
You can pause or stop recording with a single click and all you’ll be able to find your videos in the XSplit’s Recordings tab.
You can also use this software in other screen recording software, please share with us how it works for you in the comment below.
 vMix Basic HD - Software based live production. vMix Basic HD includes 4 inputs, 3 cameras, streaming, recording, playlist.
Tips for better background replacement
Changing or removing the background in a webcam video is easy, but there a few things you can do to ensure that all webcam videos created with Personify ChromaCam software meet the highest visual standards.
1. Use simple monochrome backgrounds
Complex backgrounds that contain a lot of details should be avoided at all cost because the software won’t know which part of the screen you want to replace. A minimalistic, clean working background that doesn’t contain anything that might distract the viewer or the software, will make it easier for the software to place an outline around the figure and separate it from the rest of the image.
2. Find the right balance between the performance and video quality
Logitech C922 can capture videos at 60 fps in 720p resolution when used with Personify ChromaCam, but the software also enables you to reduce the screen recording quality you’re producing and increase the quality of the webcam footage. Click on the Setting icon in the Personify window and then just drag the Performance VS Quality slider to improve the quality of the footage produced by ChromaCam. However, lowering the video quality will also decrease the frame rate, so your screen recordings may not be as smooth as they would be if they were captured at the maximum resolution.
3. Use professional lighting equipment
Logitech C922 webcam performs remarkably well, even under difficult light conditions, but having enough light in the shot will guarantee that the video meets the conventional quality standards. Webcam videos captured under low-light conditions are often blurry and the person featured in the video is hard to recognize. That’s the reason why you should always strive to have a sufficient amount of light in the webcam video, so the ChromaCam software can easily place an outline around the figure in the video. Using more than one spotlight to light the scene can help you remove the shadows cast by a Persona in the video because shadows can make the background removal software less efficient.
Max Wales
Max Wales is a writer and a lover of all things video.
Follow @Max Wales
- Title: Elevate Your Video - Remove Extraneous Details Effectively for 2024
- Author: Mary Shelley
- Created at : 2024-07-19 10:43:35
- Updated at : 2024-07-20 10:43:35
- Link: https://screen-sharing-recording.techidaily.com/elevate-your-video-remove-extraneous-details-effectively-for-2024/
- License: This work is licensed under CC BY-NC-SA 4.0.