
:max_bytes(150000):strip_icc():format(webp)/how-to-use-a-ps5-controller-on-your-pc-or-mac-5089439-b56739aa27bd48858200878a6b64f952.jpg)
Efficiently Capture and Record Your iDevice Screen for 2024
Efficiently Capture and Record Your iDevice Screen
How to Record iPhone/iPad’s Screen

Shanoon Cox
Mar 27, 2024• Proven solutions
Earlier iOS devices didn’t have the functionality to record their iPhone/iPad’s screen. This could only be done by jailbreaking the device or installing a third-party iPhone/iPad screen recorder.
Another alternative was to connect your device to a Mac and use QuickTime to record your iPhone/iPad screen. This can be also troublesome as you can not carry a Mac along with you if you need to record your iPhone/iPad’s screen.
But all this has changed with the outcome of iOS 11. Apple has added a built-in mobile screen recorder. With the iPhone/iPad built-in screen recorder, you no longer need to jailbreak your device or install third-party screen recorders.
So, in this article, we will show you how to record your iPhone/iPad screen whether your iOS device is running the latest iOS 11 and later versions or not.
- Part 1: How to Record Screen with Built-in Screen Recorder in iPhone/iPad
- Part 2: Use QuickTime to record iPhone/iPad screen
Part 1: How to Record Screen with Built-in Screen Recorder in iPhone/iPad [For iOS 11 and Later Versions]
The iOS 11 has come with a built-in mobile screen recording feature, so if you’re running the iOS 11 and later iOS versions, you can use the free recording tool of iPhone directly. This built-in app has provided a great alternative to the traditional methods to record screen videos without the use of third-party apps for iOS users. The built-in screen recorder has made the whole process very easy and simple. Follow the steps mentioned below if you want to record your iPhone/iPad’s screen.
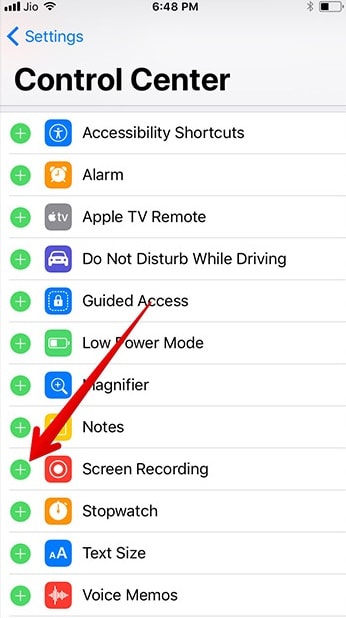
- If you don’t have a screen recorder toggle on the Control Center, you need to enable the Screen Recording feature in the Settings on your iPhone/iPad. First, tap the Settings app, and then tap Control Center > Customize Controls. Find Screen Recording then tap the green “+” button beside it to add the Screen Recording feature to Control Center.
- Open the Control Center by swiping up from the bottom of your iPhone/iPad.

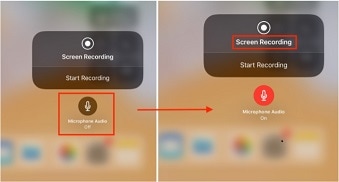
- Tap the screen recording icon that looks like a solid circle enclosed in another circle. And you will see the start recording option and a microphone button. If you want to record the microphone audio, then tap it to turn on the microphone. Then, tap on Start Recording to start.
- The video recording will start after a 3-second delay and the recording button will turn red. A notification will also appear on the top indicating recording time.
- After you are done recording, open the control center again and tap on the screen recorder button again. Alternatively, you can also tap on the red notification on the top of your screen and tap Stop at the prompt.
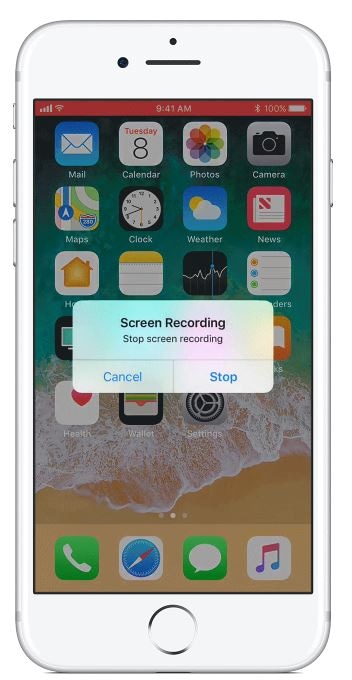
- This will stop the screen recording and the recorded video will be saved in the Photos app.
That’s the steps of how to record your iPhone screen in iOS 11 and later versions. If you want to edit the recorded video with some video editing apps, do not miss the top 10 best video editors for iPhone and iPad .
If your iOS device is running a previous version older than iOS 11, and you do not want to update, then you can record your iPhone screen with some best screen recorders for iOS, or record with QuickTime. In the following section, we will show you how to do it.
Part 2: Use QuickTime to Record Screens of iPhone/iPad (Version Before iOS 11)
People need to download and install a third-party iPhone/iPad screen recorder after jailbreaking the device and going through a complicated installation process. iOS is always risky to jailbreak your device as if you don’t do it carefully your device will get broken. It means your device will stop functioning and you will need to go to Apple care for getting it fixed. Jailbreaking also voids your warranty. So rather than going through these risks, people preferred using QuickTime to record their Phone/iPad’s screen.
With QuickTime media player you could record your iPhone/iPad’s Screen. For recording your iPhone/iPad screen with the help of QuickTime, you would need Mac OS X. Below are the steps to record your iPhone/iPad screen on your Mac by using QuickTime.
1. Connect your iOS device (iPhone/iPad/iPod touch) to your Mac with a USB cable.

2. Launch QuickTime on your Mac available in the application folder.
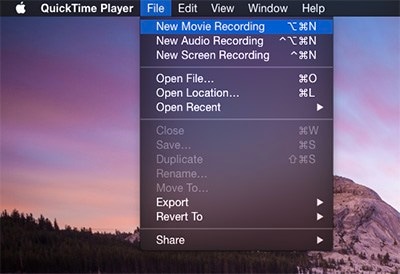
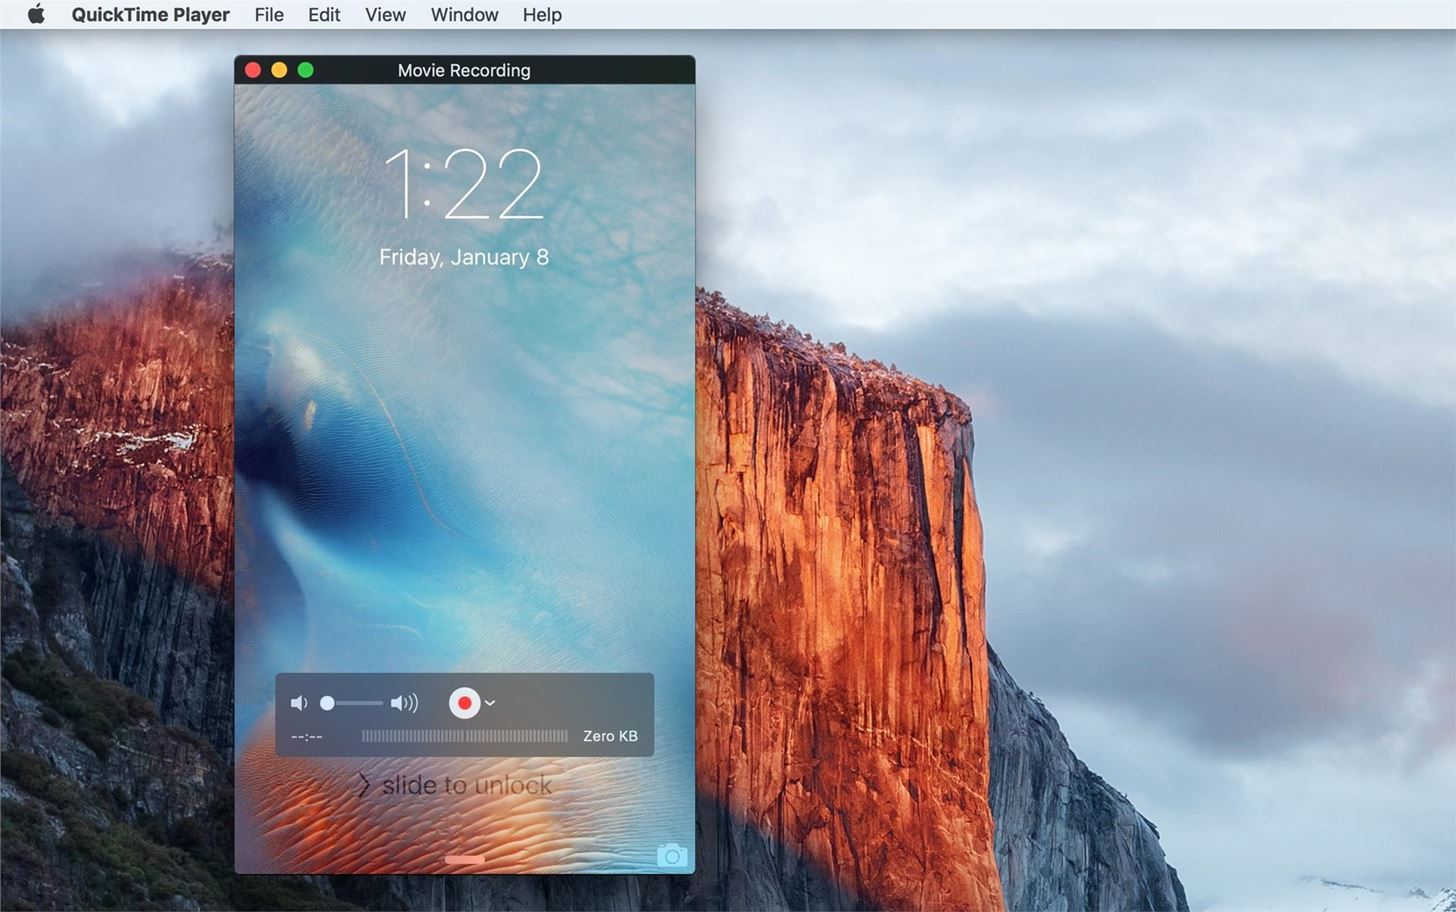
3. Click on the File menu on the QuickTime menu bar and choose New Movie Recording.
4. A video recording screen will open. Now slide the cursor over that window to make the record and volume button visible.
5. Click on the arrow next to the red record button to show the camera and microphone recording options. Choose your device from the list of devices and you will be able to see your device screen in the QuickTime window.
6. Click on the red record button when you want to start recording.
7. To stop the recording of the screen of your iOS device, click on the Stop button at the video recorder window.
8. If you want to edit the video, you can do it in QuickTime (for basic editing). You can also save the recorded video first and then edit it later. You can directly save it as it is in QuickTime by going to File Menu and clicking on save option.
The recorded video will be saved in .mov file format which you can later export to view on certain devices. You can edit the video later in QuickTime, Wondershare Filmora, or others and share it online for tutorials or demonstration, and whatever you want to do with it. This method of recording the iPhone/iPad screen is useful for devices running the iOS version lower than 11. This is a far safer method to record device screen video than jailbreaking. But with the addition of a mobile screen recorder app in iOS 11 and above, it seems a little bit clumsy by using QuickTime.
Conclusion
iPhone/iPad screen recorder is a very useful tool when you want to record tutorials, demonstrations, or report bugs. The demand for mobile screen recorders is rapidly increasing. Youngsters also love recording funny clips and videos to share the video on social media networks and other platforms. So which method offered above is better, no definite answer. All you need to consider is your own situation. But if you are looking for a screen recorder to record screen on computer , which also provides better video editing features, like blurring the private info , then try Wondershare Filmora.


Shanoon Cox
Shanoon Cox is a writer and a lover of all things video.
Follow @Shanoon Cox
Shanoon Cox
Mar 27, 2024• Proven solutions
Earlier iOS devices didn’t have the functionality to record their iPhone/iPad’s screen. This could only be done by jailbreaking the device or installing a third-party iPhone/iPad screen recorder.
Another alternative was to connect your device to a Mac and use QuickTime to record your iPhone/iPad screen. This can be also troublesome as you can not carry a Mac along with you if you need to record your iPhone/iPad’s screen.
But all this has changed with the outcome of iOS 11. Apple has added a built-in mobile screen recorder. With the iPhone/iPad built-in screen recorder, you no longer need to jailbreak your device or install third-party screen recorders.
So, in this article, we will show you how to record your iPhone/iPad screen whether your iOS device is running the latest iOS 11 and later versions or not.
- Part 1: How to Record Screen with Built-in Screen Recorder in iPhone/iPad
- Part 2: Use QuickTime to record iPhone/iPad screen
Part 1: How to Record Screen with Built-in Screen Recorder in iPhone/iPad [For iOS 11 and Later Versions]
The iOS 11 has come with a built-in mobile screen recording feature, so if you’re running the iOS 11 and later iOS versions, you can use the free recording tool of iPhone directly. This built-in app has provided a great alternative to the traditional methods to record screen videos without the use of third-party apps for iOS users. The built-in screen recorder has made the whole process very easy and simple. Follow the steps mentioned below if you want to record your iPhone/iPad’s screen.
- If you don’t have a screen recorder toggle on the Control Center, you need to enable the Screen Recording feature in the Settings on your iPhone/iPad. First, tap the Settings app, and then tap Control Center > Customize Controls. Find Screen Recording then tap the green “+” button beside it to add the Screen Recording feature to Control Center.
- Open the Control Center by swiping up from the bottom of your iPhone/iPad.
- Tap the screen recording icon that looks like a solid circle enclosed in another circle. And you will see the start recording option and a microphone button. If you want to record the microphone audio, then tap it to turn on the microphone. Then, tap on Start Recording to start.
- The video recording will start after a 3-second delay and the recording button will turn red. A notification will also appear on the top indicating recording time.
- After you are done recording, open the control center again and tap on the screen recorder button again. Alternatively, you can also tap on the red notification on the top of your screen and tap Stop at the prompt.
- This will stop the screen recording and the recorded video will be saved in the Photos app.
That’s the steps of how to record your iPhone screen in iOS 11 and later versions. If you want to edit the recorded video with some video editing apps, do not miss the top 10 best video editors for iPhone and iPad .
If your iOS device is running a previous version older than iOS 11, and you do not want to update, then you can record your iPhone screen with some best screen recorders for iOS, or record with QuickTime. In the following section, we will show you how to do it.
Part 2: Use QuickTime to Record Screens of iPhone/iPad (Version Before iOS 11)
People need to download and install a third-party iPhone/iPad screen recorder after jailbreaking the device and going through a complicated installation process. iOS is always risky to jailbreak your device as if you don’t do it carefully your device will get broken. It means your device will stop functioning and you will need to go to Apple care for getting it fixed. Jailbreaking also voids your warranty. So rather than going through these risks, people preferred using QuickTime to record their Phone/iPad’s screen.
With QuickTime media player you could record your iPhone/iPad’s Screen. For recording your iPhone/iPad screen with the help of QuickTime, you would need Mac OS X. Below are the steps to record your iPhone/iPad screen on your Mac by using QuickTime.
1. Connect your iOS device (iPhone/iPad/iPod touch) to your Mac with a USB cable.
2. Launch QuickTime on your Mac available in the application folder.
3. Click on the File menu on the QuickTime menu bar and choose New Movie Recording.
4. A video recording screen will open. Now slide the cursor over that window to make the record and volume button visible.
5. Click on the arrow next to the red record button to show the camera and microphone recording options. Choose your device from the list of devices and you will be able to see your device screen in the QuickTime window.
6. Click on the red record button when you want to start recording.
7. To stop the recording of the screen of your iOS device, click on the Stop button at the video recorder window.
8. If you want to edit the video, you can do it in QuickTime (for basic editing). You can also save the recorded video first and then edit it later. You can directly save it as it is in QuickTime by going to File Menu and clicking on save option.
The recorded video will be saved in .mov file format which you can later export to view on certain devices. You can edit the video later in QuickTime, Wondershare Filmora, or others and share it online for tutorials or demonstration, and whatever you want to do with it. This method of recording the iPhone/iPad screen is useful for devices running the iOS version lower than 11. This is a far safer method to record device screen video than jailbreaking. But with the addition of a mobile screen recorder app in iOS 11 and above, it seems a little bit clumsy by using QuickTime.
Conclusion
iPhone/iPad screen recorder is a very useful tool when you want to record tutorials, demonstrations, or report bugs. The demand for mobile screen recorders is rapidly increasing. Youngsters also love recording funny clips and videos to share the video on social media networks and other platforms. So which method offered above is better, no definite answer. All you need to consider is your own situation. But if you are looking for a screen recorder to record screen on computer , which also provides better video editing features, like blurring the private info , then try Wondershare Filmora.
Shanoon Cox
Shanoon Cox is a writer and a lover of all things video.
Follow @Shanoon Cox
Also read:
- "\"[Updated] Top 12 Tycoons - The Ultimate Challenge for Every Gamer for 2024\""
- "Mac Professionals Recommendations – The Best of ScreenFlow"
- "\"[New] In 2024, Expand Your Library Prime 10 PS5 Extra-Drives\""
- "Immediate Streams From OBS to Insta"
- "[Updated] In 2024, Discover the Leading Video Calling Apps of Today"
- "\"In 2024, Play Without Payment Top 10 Free Online Roleplaying Games\""
- "[New] In 2024, Innovative Approaches to Record & Archive Roblox Gameplay on Apple Systems"
- "\"2024 Approved Prime Selections The Best Free Screencasting Apps\""
- "[Updated] Skype Learning Logs"
- "[New] The Complete Guide to iPhone Speech Recordings"
- "\"2024 Approved Virtual Adrenaline Rushes - Top 10 Without GTA\""
- "\"2024 Approved Mastering the Art of Smooth iPad Video Recording\""
- "\"[New] 2024 Approved Unveiling the Top 10 Mobile Battle Strategies\""
- "\"[Updated] 2024 Approved Mint Magic In-Depth Analysis & Instructions for Ice Cream Cam\""
- "[Updated] How to Use LoiLo Game Recorder"
- "[Updated] In 2024, Rapid Clip Maker with Preloaded Narration Option"
- "4 Free Apps to Record Windows 8 Content"
- "\"[Updated] Inbuilt Screen Capture Huawei's Mate Series & P Lineup Phones\""
- "\"[Updated] In 2024, Mastery of Screen Recording Top 6 on Mac Systems\""
- "[Updated] Premium Top 5 Storage Solutions for Xbox for 2024"
- "[Updated] In 2024, Core Strategies for Android Video Capture"
- "[New] In 2024, Elite 10 Royal Warfare Games"
- "\"[Updated] ScoutingCameras More Than Just MyCam\""
- "\"[New] 2024 Approved Most Listened to Hits on Spotify\""
- "\"[Updated] 2024 Approved Next-Gen HD Video Transcription App\""
- "\"[New] Best 9 Smartphone Video Call Solutions IPhone vs Android Reviewed for 2024\""
- "\"[Updated] Clear Screen Techniques Focus on Your Message, Not the Ambiance\""
- "[Updated] In 2024, BriskSnatch SlowFrame Capture"
- "\"In 2024, ScreenMasterRevolution Next-Gen Recording Software\""
- "\"Video Capturing Warriors Choosing Between OBS and Fraps\""
- "\"[New] The Blueprint for Smooth OBS-to-FB Live Transitions\""
- "\"Leading Tools Top 15 Cost-Free Capture Apps for Windows & MacOS\""
- "\"2024 Approved Advanced Techniques for Smartphone Screenshots\""
- "Disabling Instant Movie Making in QuickTime"
- "\"[Updated] 2024 Approved Jotunheim Raid The War of the Worlds\""
- "\"Essential Action Triumphs The Top Games Compilation for 2024\""
- "\"[Updated] Best Martial Arts Videogames Comparison Mastery Edition\""
- "[New] In 2024, Navigating iPhone's Voice Memos with Precision"
- "[New] In 2024, The Ultimate Collection of Sandbox Game Picks"
- "\"[New] Enable VLC's Webcam Recording for High-Quality Footage for 2024\""
- "Architectural Marvels for Your Blocky Oasis for 2024"
- "\"[Updated] 2024 Approved Innovative Alternatives for Affordable Camera Screenshots\""
- "\"2024 Approved Unforgettable Journeys Our Favorites in Adventure Gameplay\""
- "\"[New] 2024 Approved Real-World Application Perfecting Your Instagram Livestream with OBS\""
- "[New] Discovering New Ways to Use Bandicam – A Deep Dive for 2024"
- "\"[New] Mastering iPhone IOS Voice Memos Recording Guide for 2024\""
- "[New] Clearing Up Audio in Skype Conferences for 2024"
- How To Restore Missing Music Files from Vivo V27
- Fastest Ways to Adjust GIF Speed Online and on Mobile
- Updated Mobile Animation Made Easy Top Free 3D Apps for Beginners for 2024
- 4 Solutions to Fix Unfortunately Your App Has Stopped Error on Xiaomi Redmi Note 12 Pro 4G | Dr.fone
- New In 2024, Top Frugal Mac Audio Mastering Toolkit
- In 2024, How to Unlock Vivo X Flip Phone Pattern Lock without Factory Reset
- How to Make the Most of Your Apple iPhone X Lock Screen with Notifications?
- New Mastering the Linkage of AirPods to Windows and Mac Systems for 2024
- How Do You Get Sun Stone Evolutions in Pokémon For Samsung Galaxy A23 5G? | Dr.fone
- How Can I Catch the Regional Pokémon without Traveling On Infinix Note 30 | Dr.fone
- In 2024, How to Unlock Apple iPhone XR?
- Forgot iPhone Passcode Again? Unlock iPhone 15 Without Passcode Now
- Updated Creative Commons Chorus Compilation for Slideshow Synthesis for 2024
- An Overview of Googles Audio Content Distribution Service
- In 2024, Dose Life360 Notify Me When Someone Checks My Location On Realme 10T 5G? | Dr.fone
- 3 Ways to Change Location on Facebook Marketplace for Infinix Note 30 | Dr.fone
- Updated In 2024, Elite Sound Polishing Programme Perfect Your Digital Storytelling
- How to Remove Audio From MP4 for 2024
- Updated In 2024, How to Edit Facebook Video Ads for E-Commerce Business
- In 2024, How to Unlock Disabled Apple iPhone 11 Pro/iPad Without Computer | Dr.fone
- How To Change Country on App Store for iPhone XR With 7 Methods | Dr.fone
- New In 2024, From Blurry to Brilliant Video Quality Improvement Solutions
- Recommended Best Applications for Mirroring Your Vivo V29 Screen | Dr.fone
- In 2024, How Can Honor Magic V2Mirror Share to PC? | Dr.fone
- 9 Solutions to Fix Process System Isnt Responding Error on Realme C53 | Dr.fone
- How does the stardust trade cost In pokemon go On Xiaomi Redmi A2? | Dr.fone
- Guide to Mirror Your Nubia Red Magic 9 Pro+ to Other Android devices | Dr.fone
- Fixed Cannot Insert Object Error in Excel 2003 | Step-by-Step Guide
- 2024 Approved Premier Free Audio-To-Image Software for iPhones and Tablets
- In 2024, List of Pokémon Go Joysticks On Honor Magic 5 Pro | Dr.fone
- How to Factory Reset Vivo X Fold 2 If I Forgot Security Code or Password? | Dr.fone
- What to do if your iPhone SE (2020) has bad ESN or blacklisted IMEI?
- Cloning Voices With Hugging Face An In-Depth Review for 2024
- Troubleshooting Error Connecting to the Apple ID Server From iPhone 15
- What is the best Pokemon for pokemon pvp ranking On Oppo A79 5G? | Dr.fone
- In 2024, How Vivo V29 Pro Mirror Screen to PC? | Dr.fone
- Hassle-Free Ways to Remove FRP Lock from Oppo K11x Phones with/without a PC
- Updated The Most Straightforward Guide to Learning How to Clone Your Voice
- New In 2024, How Can You Deny These Best 10 Free Speech to Text Software
- A Step-by-Step Guide to Finding Your Apple ID On Your iPhone 15
- 2024 Approved Shrink Your Videos Top-Rated Free Compression Software for Windows 10
- New Know How to Create OBS Slideshow. Creating OBS Slideshow in Simple Steps; Application for Creating OBS Slideshow. Make OBS Slideshow Online
- In 2024, How to Spy on Text Messages from Computer & Vivo Y200 | Dr.fone
- Title: Efficiently Capture and Record Your iDevice Screen for 2024
- Author: Mary Shelley
- Created at : 2024-05-19 21:08:08
- Updated at : 2024-05-20 21:08:08
- Link: https://screen-sharing-recording.techidaily.com/efficiently-capture-and-record-your-idevice-screen-for-2024/
- License: This work is licensed under CC BY-NC-SA 4.0.
