
"2024 Approved Step-By-Step Techniques for Optimal Voice Recording on Set"
Step-By-Step Techniques for Optimal Voice Recording on Set
Meta: Wondering how people add voice over to videos? Learn all the essential elements and steps to record voice over like professionals.
For every video you come across, the audio part is equally important as the visual part. Even when the visual part is top-notch, if the audio part such as background music and the voice narration is not good enough, you lose interest in the video. Therefore, you have to pay equal attention to the video recording as well as voiceover recording. A voiceover is basically a person speaking in the background as the video is playing along to make proper sense as well as to add more context to the video.
A voiceover recording can be describing the video, explaining concepts, highlighting important points, and likewise. Generally, a voiceover is added to the video after the video is already recorded. In order to record a good voice over, there are certain essential elements you need to have beforehand. In this article, we will explain why and how to record a voice over and how to make a voice over good to get everyone’s attention and appreciation.
1. Why To Record A Voiceover?
The engagement on a video depends both on how good the video content as well as how good the audio is. The audio in a video is not just about background music. A good voiceover can do wonders in terms of retaining the attention of the viewers as well as showcasing your personality traits.
A voice over recording is a must when you are making instructional, educational, and informational videos. Imagine watching a tutorial video where there is no voice to explain what is happening on the screen, everyone will leave the video immediately. Therefore, a voiceover essentially explains the video so that everyone can understand and even relate properly.
2. Essential elements for a good voice over
You have to ensure that your voice over recording is great from all perspectives. There are certain essential elements that you have to get right in order to make a voice over mediocre to good and even great.
Audio Clarity
Every great voiceover has perfect voice quality and comfortable volume. Audiences may find it distracting if the voiceover recording has a muddy and muffled sound. They will definitely miss the important message that you may want to share through the video. Low volume will make people difficult to hear whereas too loud can cause irritation.
To ensure audio clarity, professionals use voice over recording studio. If you generally record voice over at home, make sure you do it when there is absolute silence in the background. Besides, the mic quality should be top-notch to pick your voice only as close to original and eliminate background noise.
Pacing of Pitch
Pacing is the speed of how fast or slow your pitch is. If you go too fast, your audience will not be able to catch you. On the contrary, the slow pace can be boring. It is important to have a natural pace for everyone to understand as well as stay interested. Therefore, maintain a good pace throughout the video but take pauses to add audio effects. Pauses are a part of pacing for allowing the listeners to grab information and for you to breathe properly so that mic does not catch it.
Vocal Tone
Vocal tone is about speaking in a pleasant, soothing but natural manner. You need to make sure that the tone has to be engaging but friendly. Sometimes, you may have to fake it but it must not sound fake or boring for the listeners. A proper vocal tone comes with regular practice and experimentation.
Pronunciation
Always make sure that you pronounce every word correctly. The listeners must clearly understand what you speak clearly. Avoid mumbling, over-enunciating, and shouting. At times, you may have to avoid your regional accent to make the audience understand with more clarity. Always ask feedback from listeners to be better at pronouncing certain words.

3. How To Record A Voice Over?
Here are the steps to follow to record voiceover properly like professionals.
Getting Ready
- Location: Look for a quiet place to work. Professional voice artists opt for a soundproof room to cancel out external noise. However, you can even go for a quiet area where there is no distracting noise. Microphones can pick up ambient noise that will be reflected in the voiceover recording. Apart from human conversations, you will also have to be careful of the sound coming from electronic gadgets such as computer fans.
- Microphone: Look for a top-notch microphone as per your budget. Consider using a pop filter if you are going to use an external mic. It helps to reduce the distracting sounds with certain alphabets as well as the sound of breathing. Among affordable microphones, you may use modern earbuds or headphones with mic that you use for your smartphone. There are many USB microphones available in the market at an affordable value.
- Voiceover Recorder Software: You need a good-quality audio recording software to record voiceover as well as edit the recording as per requirement. There are many free as well as premium audio recording software available in the market today. We recommend Wondershare Filmora as you can record voice over for any video like professionals as well as edit the recording of audio and video in the same software.
Writing A Proper Script
The best way to sound professional during a voice over is to use a proper script. When you don’t use a script, then there can be a lot of pauses and you may try to think about what you will have to say next. When you use a script, you have everything planned out beforehand. Besides, you can also practice what to say when you have a script with pointers and even full explanation of each point. Try to read the script many times and be careful of the words and phrases that can be awkward. Adjust the script accordingly so that it will fit perfectly in the recording.
Performing A Test Recording
It is always advisable to go for a test recording to ensure that everything is working properly. In a test recording, you don’t have to go for the entire script but just a few paragraphs. Check if the audio is clear, the volume is at the right level, and the recording is seamless. Check the audio quality by using headphones and not computer speakers.
**Microphone Placement - If you keep the microphone too close to the mouth, there will be all kinds of weird sounds including air puffs. Too far placement will make your voice get fainted. The perfect placement should be about 6 to 8 inches from the mouth and it has to be slightly below the chin. Check the test recording carefully as some microphones can pick up sounds from the table and the computer.
Recording Voice Over
So by now, you have the video for which you want to record voiceover. You have connected the microphone to your computer. Now, it is time to record your voice over with voice over recorder Wondershare Filmora. Here are the steps to follow properly.
Step 1: Download and install Wondershare Filmora on your computer.
For Win 7 or later (64-bit)
For macOS 10.12 or later
Step 2: Launch Filmora and click on New Project option from the welcome screen.
Step 3: From Record menu, go to Record Voiceover option.
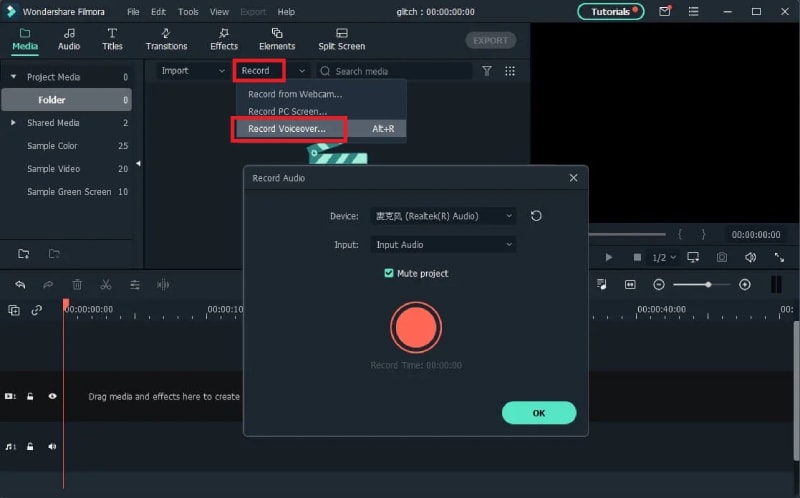
Step 4: On Record Audio screen, select your external microphone from Device option.
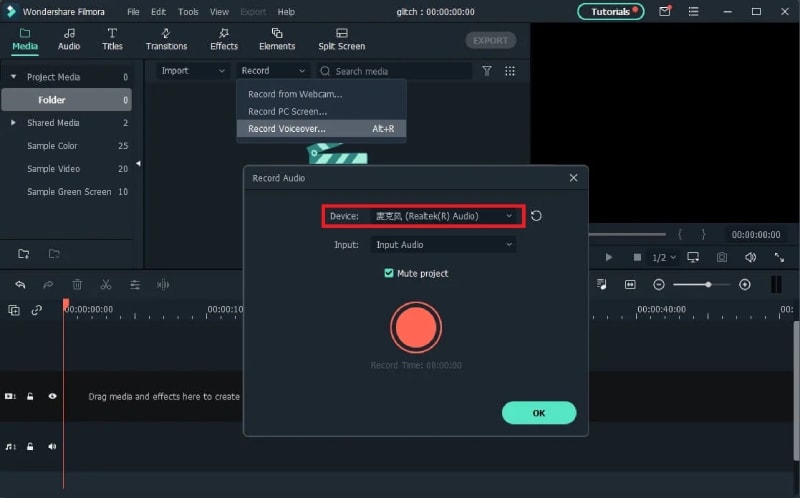
Step 5: When you are ready, click on Record button and start recording your voice over.

Step 6: When you are done, click on Stop button and export the recorded audio in MP3 format.
4. How To Edit Voice Over and Sync Voiceover to Video?
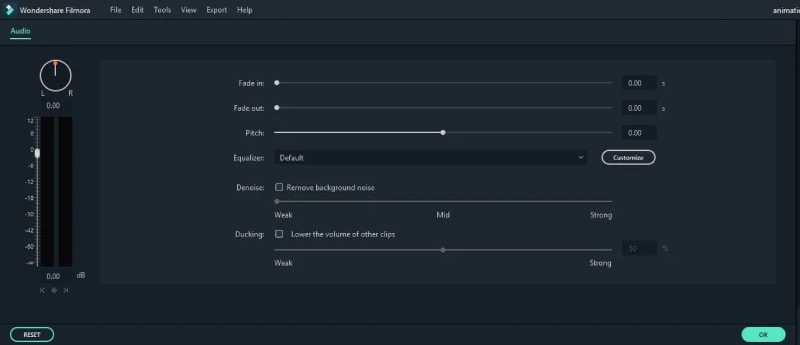
Once you have recorded the voiceover, the audio file will appear on the Audio track automatically. You will see audio settings under Audio tab where you can adjust pitch, customize equalizer, remove background noise, and add fade in and fade out effects. Besides, you get to trim the voice over track and eliminate the unnecessary and unwanted parts so that you have the crisp voice over to add to the video file.
Now, you have the recorded video and the recorded voiceover file. It is time to sync them in one file so that you can publish it. Filmora voiceover recorder is where we have to sync the files and take the following steps.
Step 1: Launch Filmora and select New Project.
Step 2: Go to File > Import Media > Import Media Files.


Step 3: Select your video file and the audio file. They will be in Import Media File area.
Step 4: Drag and drop the video file in the video track and the audio file in the audio track.
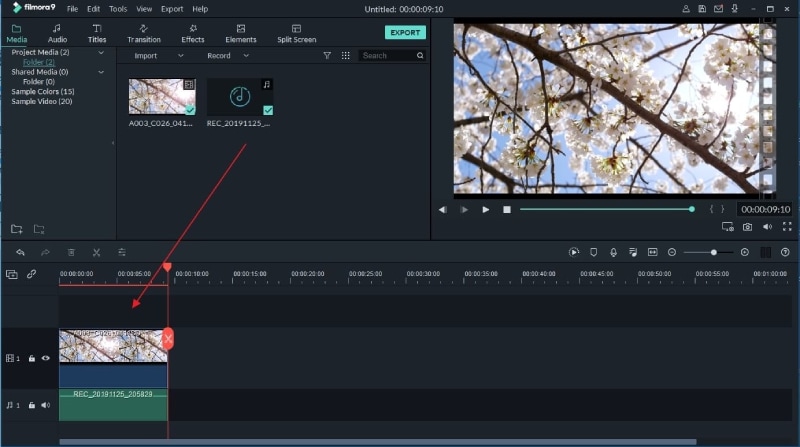
Step 5: Now, you have to adjust the audio length and placement so that the voiceover goes in sync with the video as per your intention.
Filmora supports adding multiple audio files, and hence, you can add external background music wherever required.
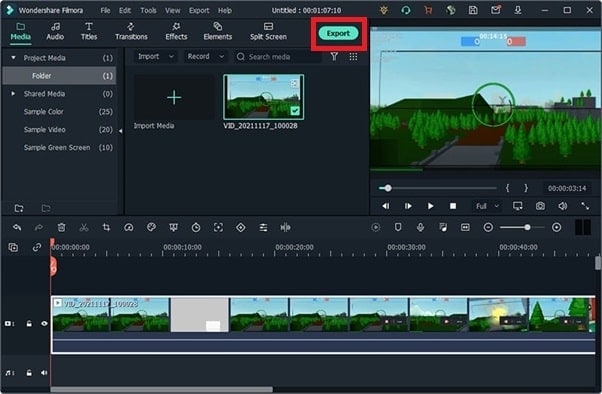
Step 6: Once everything is done, click on Export and save the video file with voiceover to your hard drive.

Therefore, you get to record, edit and sync voice over with Filmora voice over recording software all in one place.

Conclusion –
Recording voice over for videos is no more a magic. We have illustrated all the elements you need for a great voice over recording. Wondershare Filmora is the best software for voice over recording. You can also edit the voiceover and sync to the video file seamlessly. Besides, you can edit the video as well as it features a full-fledged video editor.
Writing A Proper Script
The best way to sound professional during a voice over is to use a proper script. When you don’t use a script, then there can be a lot of pauses and you may try to think about what you will have to say next. When you use a script, you have everything planned out beforehand. Besides, you can also practice what to say when you have a script with pointers and even full explanation of each point. Try to read the script many times and be careful of the words and phrases that can be awkward. Adjust the script accordingly so that it will fit perfectly in the recording.
Performing A Test Recording
It is always advisable to go for a test recording to ensure that everything is working properly. In a test recording, you don’t have to go for the entire script but just a few paragraphs. Check if the audio is clear, the volume is at the right level, and the recording is seamless. Check the audio quality by using headphones and not computer speakers.
**Microphone Placement - If you keep the microphone too close to the mouth, there will be all kinds of weird sounds including air puffs. Too far placement will make your voice get fainted. The perfect placement should be about 6 to 8 inches from the mouth and it has to be slightly below the chin. Check the test recording carefully as some microphones can pick up sounds from the table and the computer.
Recording Voice Over
So by now, you have the video for which you want to record voiceover. You have connected the microphone to your computer. Now, it is time to record your voice over with voice over recorder Wondershare Filmora. Here are the steps to follow properly.
Step 1: Download and install Wondershare Filmora on your computer.
For Win 7 or later (64-bit)
For macOS 10.12 or later
Step 2: Launch Filmora and click on New Project option from the welcome screen.
Step 3: From Record menu, go to Record Voiceover option.
Step 4: On Record Audio screen, select your external microphone from Device option.
Step 5: When you are ready, click on Record button and start recording your voice over.
Step 6: When you are done, click on Stop button and export the recorded audio in MP3 format.
4. How To Edit Voice Over and Sync Voiceover to Video?
Once you have recorded the voiceover, the audio file will appear on the Audio track automatically. You will see audio settings under Audio tab where you can adjust pitch, customize equalizer, remove background noise, and add fade in and fade out effects. Besides, you get to trim the voice over track and eliminate the unnecessary and unwanted parts so that you have the crisp voice over to add to the video file.
Now, you have the recorded video and the recorded voiceover file. It is time to sync them in one file so that you can publish it. Filmora voiceover recorder is where we have to sync the files and take the following steps.
Step 1: Launch Filmora and select New Project.
Step 2: Go to File > Import Media > Import Media Files.

Step 3: Select your video file and the audio file. They will be in Import Media File area.
Step 4: Drag and drop the video file in the video track and the audio file in the audio track.
Step 5: Now, you have to adjust the audio length and placement so that the voiceover goes in sync with the video as per your intention.
Filmora supports adding multiple audio files, and hence, you can add external background music wherever required.
Step 6: Once everything is done, click on Export and save the video file with voiceover to your hard drive.
Therefore, you get to record, edit and sync voice over with Filmora voice over recording software all in one place.
Conclusion –
Recording voice over for videos is no more a magic. We have illustrated all the elements you need for a great voice over recording. Wondershare Filmora is the best software for voice over recording. You can also edit the voiceover and sync to the video file seamlessly. Besides, you can edit the video as well as it features a full-fledged video editor.
Writing A Proper Script
The best way to sound professional during a voice over is to use a proper script. When you don’t use a script, then there can be a lot of pauses and you may try to think about what you will have to say next. When you use a script, you have everything planned out beforehand. Besides, you can also practice what to say when you have a script with pointers and even full explanation of each point. Try to read the script many times and be careful of the words and phrases that can be awkward. Adjust the script accordingly so that it will fit perfectly in the recording.
Performing A Test Recording
It is always advisable to go for a test recording to ensure that everything is working properly. In a test recording, you don’t have to go for the entire script but just a few paragraphs. Check if the audio is clear, the volume is at the right level, and the recording is seamless. Check the audio quality by using headphones and not computer speakers.
**Microphone Placement - If you keep the microphone too close to the mouth, there will be all kinds of weird sounds including air puffs. Too far placement will make your voice get fainted. The perfect placement should be about 6 to 8 inches from the mouth and it has to be slightly below the chin. Check the test recording carefully as some microphones can pick up sounds from the table and the computer.
Recording Voice Over
So by now, you have the video for which you want to record voiceover. You have connected the microphone to your computer. Now, it is time to record your voice over with voice over recorder Wondershare Filmora. Here are the steps to follow properly.
Step 1: Download and install Wondershare Filmora on your computer.
For Win 7 or later (64-bit)
For macOS 10.12 or later
Step 2: Launch Filmora and click on New Project option from the welcome screen.
Step 3: From Record menu, go to Record Voiceover option.
Step 4: On Record Audio screen, select your external microphone from Device option.
Step 5: When you are ready, click on Record button and start recording your voice over.
Step 6: When you are done, click on Stop button and export the recorded audio in MP3 format.

4. How To Edit Voice Over and Sync Voiceover to Video?
Once you have recorded the voiceover, the audio file will appear on the Audio track automatically. You will see audio settings under Audio tab where you can adjust pitch, customize equalizer, remove background noise, and add fade in and fade out effects. Besides, you get to trim the voice over track and eliminate the unnecessary and unwanted parts so that you have the crisp voice over to add to the video file.
Now, you have the recorded video and the recorded voiceover file. It is time to sync them in one file so that you can publish it. Filmora voiceover recorder is where we have to sync the files and take the following steps.
Step 1: Launch Filmora and select New Project.
Step 2: Go to File > Import Media > Import Media Files.
Step 3: Select your video file and the audio file. They will be in Import Media File area.
Step 4: Drag and drop the video file in the video track and the audio file in the audio track.
Step 5: Now, you have to adjust the audio length and placement so that the voiceover goes in sync with the video as per your intention.
Filmora supports adding multiple audio files, and hence, you can add external background music wherever required.
Step 6: Once everything is done, click on Export and save the video file with voiceover to your hard drive.
Therefore, you get to record, edit and sync voice over with Filmora voice over recording software all in one place.
Conclusion –
Recording voice over for videos is no more a magic. We have illustrated all the elements you need for a great voice over recording. Wondershare Filmora is the best software for voice over recording. You can also edit the voiceover and sync to the video file seamlessly. Besides, you can edit the video as well as it features a full-fledged video editor.
Writing A Proper Script
The best way to sound professional during a voice over is to use a proper script. When you don’t use a script, then there can be a lot of pauses and you may try to think about what you will have to say next. When you use a script, you have everything planned out beforehand. Besides, you can also practice what to say when you have a script with pointers and even full explanation of each point. Try to read the script many times and be careful of the words and phrases that can be awkward. Adjust the script accordingly so that it will fit perfectly in the recording.
Performing A Test Recording
It is always advisable to go for a test recording to ensure that everything is working properly. In a test recording, you don’t have to go for the entire script but just a few paragraphs. Check if the audio is clear, the volume is at the right level, and the recording is seamless. Check the audio quality by using headphones and not computer speakers.
**Microphone Placement - If you keep the microphone too close to the mouth, there will be all kinds of weird sounds including air puffs. Too far placement will make your voice get fainted. The perfect placement should be about 6 to 8 inches from the mouth and it has to be slightly below the chin. Check the test recording carefully as some microphones can pick up sounds from the table and the computer.
Recording Voice Over
So by now, you have the video for which you want to record voiceover. You have connected the microphone to your computer. Now, it is time to record your voice over with voice over recorder Wondershare Filmora. Here are the steps to follow properly.
Step 1: Download and install Wondershare Filmora on your computer.
For Win 7 or later (64-bit)
For macOS 10.12 or later
Step 2: Launch Filmora and click on New Project option from the welcome screen.
Step 3: From Record menu, go to Record Voiceover option.
Step 4: On Record Audio screen, select your external microphone from Device option.
Step 5: When you are ready, click on Record button and start recording your voice over.
Step 6: When you are done, click on Stop button and export the recorded audio in MP3 format.
4. How To Edit Voice Over and Sync Voiceover to Video?
Once you have recorded the voiceover, the audio file will appear on the Audio track automatically. You will see audio settings under Audio tab where you can adjust pitch, customize equalizer, remove background noise, and add fade in and fade out effects. Besides, you get to trim the voice over track and eliminate the unnecessary and unwanted parts so that you have the crisp voice over to add to the video file.
Now, you have the recorded video and the recorded voiceover file. It is time to sync them in one file so that you can publish it. Filmora voiceover recorder is where we have to sync the files and take the following steps.
Step 1: Launch Filmora and select New Project.
Step 2: Go to File > Import Media > Import Media Files.
Step 3: Select your video file and the audio file. They will be in Import Media File area.
Step 4: Drag and drop the video file in the video track and the audio file in the audio track.
Step 5: Now, you have to adjust the audio length and placement so that the voiceover goes in sync with the video as per your intention.
Filmora supports adding multiple audio files, and hence, you can add external background music wherever required.
Step 6: Once everything is done, click on Export and save the video file with voiceover to your hard drive.
Therefore, you get to record, edit and sync voice over with Filmora voice over recording software all in one place.
Conclusion –
Recording voice over for videos is no more a magic. We have illustrated all the elements you need for a great voice over recording. Wondershare Filmora is the best software for voice over recording. You can also edit the voiceover and sync to the video file seamlessly. Besides, you can edit the video as well as it features a full-fledged video editor.
- Title: 2024 Approved Step-By-Step Techniques for Optimal Voice Recording on Set
- Author: Mary Shelley
- Created at : 2024-07-19 08:06:40
- Updated at : 2024-07-20 08:06:40
- Link: https://screen-sharing-recording.techidaily.com/2024-approved-step-by-step-techniques-for-optimal-voice-recording-on-set/
- License: This work is licensed under CC BY-NC-SA 4.0.